Golf Drills/Practice
Putting with a Wedge – According to a Major Winner
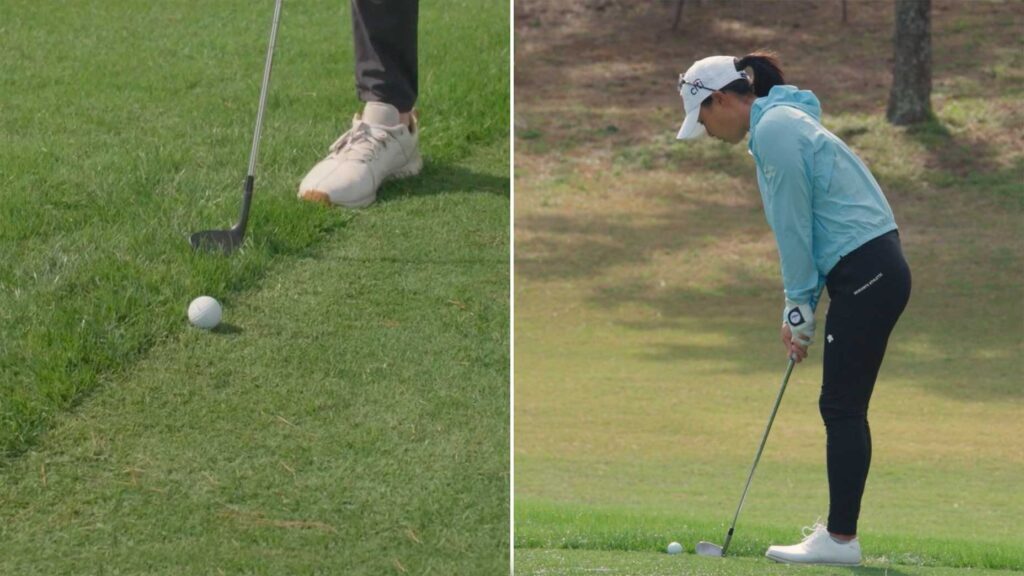
Not sure what to do when your ball meets the fringe and the rough? Major champion Danielle Kang explains how she approaches these situations and demonstrates this shot every golfer should have in their bag.
Golf is a game of inches, and the difference between a good shot and a bad one can come down to the smallest of margins. “That’s what she said” credit to the all-time Michael Scott – – sorry I couldn’t resist!
That’s particularly clear when your ball settles off the side of the green in the exact spot where the fringe meets the rough. This spot, referred to as the collar, is a particularly tricky area on every course. Although it’s just feet away from the putting surface, playing your ball from this area is anything but simple. Watch This Video Below to see it in action! ???
Official USGA Rule: Explained here ?When your ball is pressed up against the collar ?, there’s no easy way to approach the shot. Putting is very tricky because the rough won’t allow you to make a smooth stroke. But chipping the ball also isn’t easy because the long grass will impact your ability to cleanly strike the ball. In other words, creativity is key.
For help with how to approach this shot, we enlisted major-winner Danielle Kang in this episode of Pros Teaching Joes. Check out the video at the top of the article, or read below for more.
1. Approach it like a putt
Kang explained that she wants these types of shots to come out like a putt would with Topspin. But with the rough making using a putter impossible, she hits the shot with a wedge instead.
2. Use the toe of the club
Instead of hitting the ball with the center of the face, Kang wants to use the toe of the club for this shot. This takes away the “hotness” of the ball off the face and helps eliminate backspin and promotes top spin.
3. Use a putting stroke
Although you’re using a wedge for this shot, you aren’t going to be using the same technique as your typical chip. You want to play the ball back in your stance and leave the heel of the club up. Choke up on the grip and try to hit a little bit down on the ball.
“It’s not like a chip,” Kang says. “It’s more of like a putting motion.”
4. Visualize your line
Once you get all the basic of the shot down, all that’s left is to visualize the line, commit, and hit the shot. Read the green like you would a putt, and imagine how the ball would roll out on the green. Play the shot like a putt and watch it track toward the center of the cup.
Drills
Master Your Game: 3 Range Drills You Can Do in Just 20 Minutes
Short on time but want to lower your scores? Our Resident PGA Pro shares 3 range drills that take only 20 minutes but deliver maximum results for your game improvement.
We have all been there. You have a tee time in forty minutes, your swing feels a bit out of sync, and you are frantically pounding a bucket of balls without a clear plan. As a PGA Pro, I see this every single day on the practice tee—golfers searching for a miracle in a bucket of 100 balls. The truth is, more volume rarely leads to better scores. What you actually need is a structured, purposeful routine that sharpens your mechanics and prepares your mind for the course.
Quality practice is about intention, not duration. In today’s fast-paced world, finding three hours for the range is a luxury most of us don’t have. That is why I have developed these 3 range drills specifically designed for the golfer on a schedule. Whether you are looking for game improvement or just a quick tune-up before your Saturday morning round, let’s work through this together to ensure every swing you take actually moves the needle on your handicap.
The Gate Drill for Pure Ball Striking
The first of our 3 range drills focuses on the most fundamental aspect of the game: center-face contact. I often tell my students that you can have the most beautiful swing in the world, but if you cannot find the middle of the clubface, it simply does not matter. This drill is designed to provide immediate, tactile feedback on your swing path and impact point.
To set this up, place two alignment sticks or even two golf tees just slightly wider than the width of your clubhead. Place your ball directly in the center of this “gate.” The goal is simple: strike the ball without touching the gates. If you tend to come over the top, you will likely clip the outer gate. If your path is too far from the inside, the inner gate will let you know immediately. This is about precision and discipline.
Why Feedback Matters in Game Improvement
The reason this works so well for game improvement is that it removes the guesswork. When you are practicing alone, it is easy to fall into the trap of “feeling” like you made a good swing when the result was actually a lucky miss. The gate drill forces your hands and brain to coordinate a neutral path. Start with half-swings using a 7-iron to get the feel, then gradually work up to full speed.
In my years of teaching, I have found that golfers who spend just five minutes on this drill develop a much higher level of “clubhead awareness.” You begin to feel where the head is in space. By the time you reach the first tee, your subconscious is already calibrated to find the sweet spot. Remember, we aren’t looking for power here; we are looking for the pure click of a centered strike.
The 9-Shot Challenge: Mastering Flight Control
Once we have established solid contact, we need to move toward shot-making. This is the second of our 3 range drills, and it is a personal favorite of mine for 2025 prep. On the course, you rarely face a perfectly flat lie with no wind. You need to be able to curve the ball and control the trajectory. The 9-Shot Challenge forces you to become a creator rather than a mechanical robot.
Here is how it works: you are going to attempt nine different shots in a row. These include a low draw, a low straight shot, and a low fade; then a medium draw, medium straight, and medium fade; and finally, a high draw, high straight, and high fade. Don’t worry if you can’t pull off all nine perfectly at first. The key is the intent. By trying to change your ball flight, you learn how your setup and swing path affect the outcome.
Technical Adjustments for Shape and Height
To hit it low, move the ball slightly back in your stance and keep your finish abbreviated. To hit it high, move it forward and let your hands finish high over your shoulder. For the draws and fades, focus on your alignment and your clubface at impact. If you want to fade it, open your stance slightly but keep the face pointed at the target. To draw it, do the opposite.
This drill is one of the best golf tips I can give for mental toughness. It prevents you from getting into a “range groove” where you hit the same club to the same target over and over. In a real round, every shot is different. By practicing these variations, you are building a toolkit that you can rely on when the wind picks up or you need to navigate around a tree on the back nine.
The Pressure-Cooker Finish
The final phase of our 20-minute session is about simulation. Many golfers can hit beautiful shots on the range but struggle to translate that to the course. This is often because the range lacks consequences. To fix this, we use the “Pressure-Cooker” drill. Pick a specific target on the range—perhaps a yardage marker or a specific flag—and imagine it is the 18th green with a career-best score on the line.
You must hit three different clubs (for example, a driver, a 6-iron, and a wedge) to three different targets. If you miss a target, you have to start the sequence over. This introduces a small but effective level of performance anxiety. It forces you to go through your full pre-shot routine: pick your line, take your breath, visualize the flight, and execute. You aren’t just hitting balls anymore; you are playing golf.
Incorporating Game Improvement Goals
As we look toward your goals for the coming year, this type of “random practice” is what separates the single-digits from the high-handicappers. It builds what we call “functional skill.” When you only have 20 minutes, spending the last five minutes under self-imposed pressure ensures that your brain stays engaged. It bridges the gap between the relaxed environment of the practice tee and the high-stakes environment of the competition.
I always tell my students: don’t leave the range until you’ve “completed” a pressure task. Even if it’s just hitting one fairway with your driver, that small win builds confidence. You want to walk to your car feeling like a winner, not like someone who just went through the motions. This intentionality is the secret sauce to rapid improvement.
Conclusion: Making the Most of Your Practice
Effective practice doesn’t require hours of your time; it requires a plan. By utilizing these 3 range drills—the Gate Drill for contact, the 9-Shot Challenge for control, and the Pressure-Cooker for realism—you can transform your game in just 20 minutes. Focus on the fundamentals, stay disciplined with your routine, and remember that every shot should have a purpose. If you commit to this structured approach, I guarantee you will see your scores begin to drop as your confidence rises.
I want to hear from you as you implement these routines. Which of these drills do you think will be the biggest challenge for your current game? Have you tried this type of timed practice before? Share your thoughts and your progress in the comments below! Let’s make 2026 your best year on the links yet.
Drills
The 3-Putt Killer: A Simple Drill to Master Your Speed Control
Eliminate three-putts for good with this simple and effective putting drill. Our Resident PGA Pro breaks down how to master your speed control and transform your game on the greens.
There is nothing more frustrating in golf than a three-putt. You’ve done the hard work of getting to the green, only to give away a shot with a clumsy performance on the putting surface. The primary culprit for most amateurs? Poor speed control. In this article, we will break down a simple drill, which is an effective putting drill designed to help you eliminate three-putts by mastering your speed control. This is a fundamental putting practice that can transform your game.
Understanding the Importance of Speed Control
Most golfers focus excessively on the line of their putt. While the line is important, speed is the dominant factor in successful putting. If your speed is correct, the ball has a much better chance of falling into the hole, even if the line is slightly off. Good speed control ensures that even your missed putts leave you with a simple tap-in, taking the dreaded three-putt out of play. This putting drill is designed to train your brain and body to feel the correct distance, which is the key to consistent speed.
The Ladder, A Simple Drill: Your Path to Fewer Putts
One of the most effective drills for improving speed control is the “Ladder Drill.” It’s a simple putting practice that requires only three balls and a putter. Here’s how to set it up and execute it to perfection.
Step 1: Setting Up the Drill
Find a relatively flat area on the practice green. You don’t need a hole for this drill. Place three balls in a line, about three feet apart from each other, starting about 10 feet from the edge of the green. Your setup should look like a ladder, with each ball representing a rung.
Step 2: Executing the Drill
1.First Putt (10 feet): Start with the ball closest to you (10 feet from the edge). Your goal is to putt the ball so that it stops as close to the fringe as possible without going off the green.
2.Second Putt (13 feet): Move to the second ball. Again, your goal is to get the ball as close to the fringe as possible.
3.Third Putt (16 feet): Finally, putt the third ball with the same objective.
After you have completed the first “ladder,” retrieve your balls and repeat the process from different distances and angles. The key is to create a new challenge each time. This forces you to adapt and develop a feel for different putt lengths.

Why This Putting Drill Works
The Ladder Drill is effective because it isolates the feeling of distance. By removing the hole as a target, you are forced to concentrate solely on the speed of the putt. This helps you develop a more intuitive sense of how hard to hit the ball to cover a specific distance. Consistent practice of this drill will help you eliminate three-putts and build confidence on the greens.
Key Takeaways for Your Putting Practice
•Focus on Speed: Prioritize speed over line in your putting practice.
•Practice with Purpose: Use drills like the Ladder Drill to create a structured and effective practice routine.
•Develop Your Feel: The goal is to develop an intuitive feel for distance, which will translate to better performance on the course.
By incorporating this simple putting drill into your regular practice, you will be well on your way to becoming a more confident and consistent putter. Say goodbye to the frustration of the three-putt and hello to lower scores. What are your favorite putting drills for speed control? Share your thoughts in the comments below!
Drills
Golf Fitness for the Off-Season: Build Strength, Flexibility, and Power Before Spring
Now is the time to get in shape before the season starts. Start your routine now so you can be ready.
As the days grow shorter and the golf courses are covered in a blanket of frost or snow, it’s easy to let your clubs gather dust in the garage. But what if this winter off-season wasn’t an end, but a beginning? What if you could use these next few months to build a stronger, more flexible, and more powerful body, emerging in the spring not just rust-free, but fundamentally better than you were last season?
Welcome to your off-season game plan. This isn’t about grueling, two-hour gym sessions. This is a smart, targeted approach to golf fitness that will increase your clubhead speed, improve your consistency, and dramatically reduce your risk of injury. By focusing on the three pillars of athletic performance—Mobility, Strength, and Power—you can transform your game without ever hitting a ball.
Why Off-Season Fitness is a Game-Changer
During the golf season, our focus is on playing. It’s difficult to make significant physical gains when your body is also trying to recover from rounds and practice sessions. The off-season, however, presents a golden opportunity. It’s a dedicated block of time where you can push your body, build a solid foundation, and make improvements that are simply not possible mid-season .
Furthermore, the physical qualities required for a powerful and resilient golf swing are the exact same qualities essential for long-term health and vitality. As we age, we naturally lose muscle mass, strength, and power—a process that is catastrophic for both our golf game and our quality of life. The good news? All of these factors are incredibly trainable at any age. Research on adults aged 60 to 83 years found that just 8-16 weeks of resistance training improved maximal strength by approximately 18% and rate of force development by 27% . The workout that adds 15 yards to your drive is the same one that helps you carry groceries with ease and stay independent for decades to come.
The Three Pillars of a Powerful Golf Swing
A successful golf fitness program doesn’t need to be complicated. It should be built on a consistent and progressive approach focused on three key areas.

Pillar 1: Mobility – The Foundation of a Fluid Swing
Mobility is the ability to move a joint through its full range of motion with control. For golfers, this is non-negotiable. Without adequate mobility in your hips, thoracic spine (upper back), and shoulders, your body will be forced to find that rotation from other, less stable areas, like your lower back—a leading cause of golf-related pain and injury.
Why it Matters: A bigger turn in your backswing creates a longer arc, which directly translates to more clubhead speed. How much you turn your pelvis and torso, and how far your hands travel around the clock in the backswing, play a very important role in your club head speed . Improved mobility allows you to generate this rotation safely and efficiently.
The Focus: Hips, Thoracic Spine, Shoulders. The beauty of mobility training is that it doesn’t require any equipment, is not very taxing, and the gains are immediate. It doesn’t even require much training time.

Pillar 2: Strength – The Engine of Your Swing
Strength is the ability to produce force. It’s the engine that powers your golf swing. A stronger body is a more stable body, allowing you to maintain your posture and balance from address to follow-through. It’s also the foundation upon which you build power.
Why it Matters: Strength is essential for creating speed, controlling the club, and preventing the breakdown of swing mechanics due to fatigue over 18 holes. It is arguably the most underappreciated physical quality in the general population, and it requires specific training to maintain . Everyday tasks or just being active is not sufficient to preserve muscle strength as we age.
The Focus: Full-body, compound movements like squats, hinges (deadlifts), presses, and rows. These exercises engage multiple muscle groups simultaneously, building functional strength that translates directly to the golf course.
Pillar 3: Power – Unleashing Your Speed
If strength is the size of your engine, power is how quickly you can rev it. In golf, this is known as Rate of Force Development (RFD)—how rapidly you can generate force. The golf swing is an explosive, athletic movement that happens in the blink of an eye. You don’t have time to gradually ramp up to maximum force; you need to be able to summon it instantly.
Why it Matters: RFD is the physical quality most closely correlated with clubhead speed. It declines more rapidly with age than strength or muscle mass, which is why explosive training is a critical, yet often overlooked, component of golf fitness . A minuscule percentage of adults train explosively, but those who do see dramatic improvements in their ability to generate speed.
The Focus: Explosive movements like medicine ball throws, jumps, and kettlebell swings. These exercises train your nervous system to recruit muscle fibers rapidly, creating the explosive power needed for a fast, powerful swing.
Your At-Home Off-Season Workout Plan
You don’t need a fancy gym membership to build a golf-ready body. This simple and effective workout can be done at home with minimal equipment (a few dumbbells or kettlebells and resistance bands are helpful).
Frequency: Perform this full-body workout 2-3 times per week on non-consecutive days.
Exercise Category Exercise Example Sets & Reps Why It Helps Your Golf Game 1. Dynamic Warm-Up 90/90 Hip Switches 2 sets of 10 reps/side Improves hip internal and external rotation, crucial for a powerful backswing and follow-through. (Mobility) Cat-Cow 2 sets of 10 reps Mobilizes the spine, warming up the muscles of the back and core. Thoracic Rotations (Quadruped) 2 sets of 8 reps/side Increases rotation in the upper back, allowing for a bigger, safer turn away from the ball. 2. Power Medicine Ball Rotational Slams 3 sets of 5 reps/side Develops explosive power in the transverse (rotational) plane, mimicking the golf swing. Box Jumps (or Broad Jumps) 3 sets of 5 reps Trains lower body explosiveness and improves your ability to use the ground for power. 3. Strength Goblet Squats 3 sets of 8-10 reps Builds lower body and core strength, essential for stability and power generation. Dumbbell Bent-Over Rows 3 sets of 8-10 reps Strengthens the back and shoulders, helping to maintain posture throughout the swing. Glute Bridges 3 sets of 12-15 reps Activates and strengthens the glutes, the most powerful muscles in your body and key for a stable swing. 4. Core Pallof Press 3 sets of 10 reps/side An anti-rotation exercise that builds incredible core stability to resist unwanted movement during the swing. Dead Bug 3 sets of 10 reps/side Improves coordination and strengthens the deep core muscles that protect your lower back.
Progression: Start at an appropriate level for your current fitness, and slowly and gradually increase the demand of the training as you improve. This principle of progressive overload is the key to long-term gains.
Injury Prevention: Play Smarter, Not Harder
The repetitive nature of the golf swing can take a toll on the body. The most common injuries are not acute, sudden events, but chronic overuse issues that build up over time . The lower back, wrists, and elbows are particularly vulnerable.
“People often think swinging a golf club is just about the arms and shoulders, but it’s really a total body workout,” explains Dr. Daniel Komlos, an orthopedic surgeon at Houston Methodist. “Building strength is also critical for injury prevention, since the repetitive motions and prolonged gripping that come with playing golf can take a toll on your muscles and joints.”

Interestingly, while golfer’s elbow (medial epicondylitis) gets its name from the sport, lateral epicondylitis—more commonly known as tennis elbow—is actually the more prevalent elbow injury among golfers . This happens because of the prolonged grip and positioning of the wrist while gripping a golf club. Other potential injuries include triceps tendonitis, rotator cuff injuries, and lower back sprains and strains.
Here are the most important strategies to stay injury-free:
Always Warm Up: Never step onto the first tee cold. A 5-10 minute dynamic warm-up (like the one in the workout plan) increases blood flow to your muscles and prepares your joints for the rotational demands of the swing. Stretch frequently, using slow, controlled movements that work through your full range of motion. Pay particular attention to the mobility of your shoulders, neck, wrists, and lower back, since flexibility is key for a smooth swing .
Listen to Your Body: This is the golden rule. Pain is your body’s signal that something is wrong. The “no pain, no gain” mantra does not apply to joint pain in golf. If you feel a sharp or unusual pain, it’s time to rest. After about two weeks, you should be pain-free and can return to playing. But if you notice the pain comes back, you should stop and see a doctor . Pushing through pain is the fastest way to turn a minor issue into a major setback.
Strengthen Your Core: A strong and stable core is your best defense against lower back pain. It acts as a corset, protecting your spine from excessive rotational forces. Incorporate exercises like planks, bridges, and rotational core work into your routine.
Build Gradually: If you haven’t played in a while, don’t jump into a full round or multiple rounds in quick succession. Increase practice intensity and frequency slowly to avoid overuse. This is especially important as we age, when muscles and joints are more prone to overuse injuries.
Conclusion: The Time to Start is Now
The winter off-season is a gift. It’s an opportunity to invest in your most important piece of golf equipment: your body. By dedicating just a few hours a week to a structured fitness program, you can build a foundation of mobility, strength, and power that will pay massive dividends when the season begins.
Don’t wait for spring to start thinking about your golf game. Start today. Begin with the mobility exercises, gradually incorporate the strength and core work, and then add in the power movements as you feel comfortable. Track your progress, stay consistent, and trust the process. When you step onto the first tee next season, you won’t just feel ready—you’ll be objectively, measurably better. Your swing will be faster, your body will be more resilient, and your scores will reflect the work you put in during the cold months.
References
-
Product Review6 years agoThe Perfect Practice Putting Mat Review by Jason Tenzer
-
Blog5 years agoLoophole Rule Offers PGA Tour Pros a Mulligan
-
Blog5 years ago2021 Buyer’s Guide: The Top 10 Value Golf Balls For Distance & Feel
-
Blog5 years agoGolf Marriage Counselor
-
Product Review6 years agoTHE ADJUSTABLE IRONS: WALKING STICKS GOLF CLUBS
-
Blog7 years ago9 Biggest Chokes Of The Past Decade
-
Blog5 years agoWhat Your Golf Clubs Say About You
-
News1 month agoThe latest news in golf


