Golf Drills/Practice
10 Signs You Are Going to Hit a Bad Shot Before You Swing

I’ll go ahead and state the obvious: Golf is hard. The margin for error is slim, and even the slightest misstep can result in disaster. Synchronizing all the moving parts needed to accurately strike the ball — all within a roughly two-second window — is no easy task. And that’s just during the swing.
In addition to needing precision during the swing, you also need to nail your pre-shot routine as well. There are several factors that can influence a poor shot before you even swing, and you’ve got to be cognizant of those as well.
The good news is, those pre-shot factors are much easier to control than those that come up during the swing. And if you can get them down, you’ll put yourself in a better position to hit a solid shot.
GOLF Top 100 Teacher Michael Hunt compiled a list of 10 ways to know you’re going to hit a bad shot before you even swing. Check them out below, and be wary of them next time you’re on the course. If you can correct these mistakes before you pull the trigger, your scorecard will thank you.
1. Too many thoughts
Thinking too much when you’re over the ball can result in paralysis by analysis. Try to get one solid swing thought and stick to it. Don’t overcomplicate an already complex game.
2. Not factoring elements
How many times have you rushed to hit a shot only to realize after the fact that you were facing a strong headwind that causes the ball to come up well short? Instead of rushing to hit the shot, take a second to analyze the wind, lie, slope and elevation that will affect your ball flight.
3. Alignment
It might seem elementary, but make sure you are aimed where you think you are. Put an alignment stick or extra club down your target line at the range and make sure your aim matches with where you think you’re aiming.
4. Too far or close to the ball
Make sure your setup is tuned up before you head to the course. If you have a poor setup, it’ll make hitting a solid shot that much more difficult.
5. Too much time over the ball
This goes along with the first point above. Don’t stand over the ball too long or you may psyche yourself out. If you find yourself standing over the ball too long, step off the shot, regroup and get back into it.
6. Tension
Stay loose over the ball! Don’t try to squeeze the life out of the club. Relax.
7. Fear
Don’t focus on what could go wrong. Instead, focus on the shot you want to execute. If your mind is on the water hazard right of your target, chances are you’ll hit it in there. Keep your mind on what you want to do, not what you don’t want to do.
8. Uncommitted
There should be no half measures on the course. If you are going to hit a shot, make sure you’re fully committed to it.
9. Indecision
This goes along with the point above. Make a decision and commit to it.
10. Bad angles at setup
Be sure your body is in sync in the setup. If your feet are aimed one way, and your shoulders another, the shot has no chance to be struck on line. Make sure everything is working together.
This article originally appeared on Golf.com.
Blog
The Mental Game of Golf: Mastering the Psychology Behind Lower Scores

It’s a scenario every golfer knows intimately: you’ve just striped a perfect drive down the middle of the fairway, only to follow it up with a chunked iron shot that barely advances the ball. Frustration mounts, your focus shatters, and the rest of the hole—and perhaps the round—unravels. While we often blame our swing mechanics for these inconsistencies, the true culprit frequently lies between our ears. Research consistently shows that the mental game accounts for a staggering 70-90% of performance in golf . Yet, despite its monumental importance, studies reveal that only about 14% of golfers regularly practice their mental skills .
This article is designed to change that. We will explore the critical role of psychology in golf, break down the most common mental errors that sabotage your scores, and provide you with professional-grade techniques and practical drills to build an unshakeable mental game. By the end, you will have a clear roadmap to not only lower your handicap but also to find more joy and resilience on the course.
Why the Mental Game is Your Most Important Club
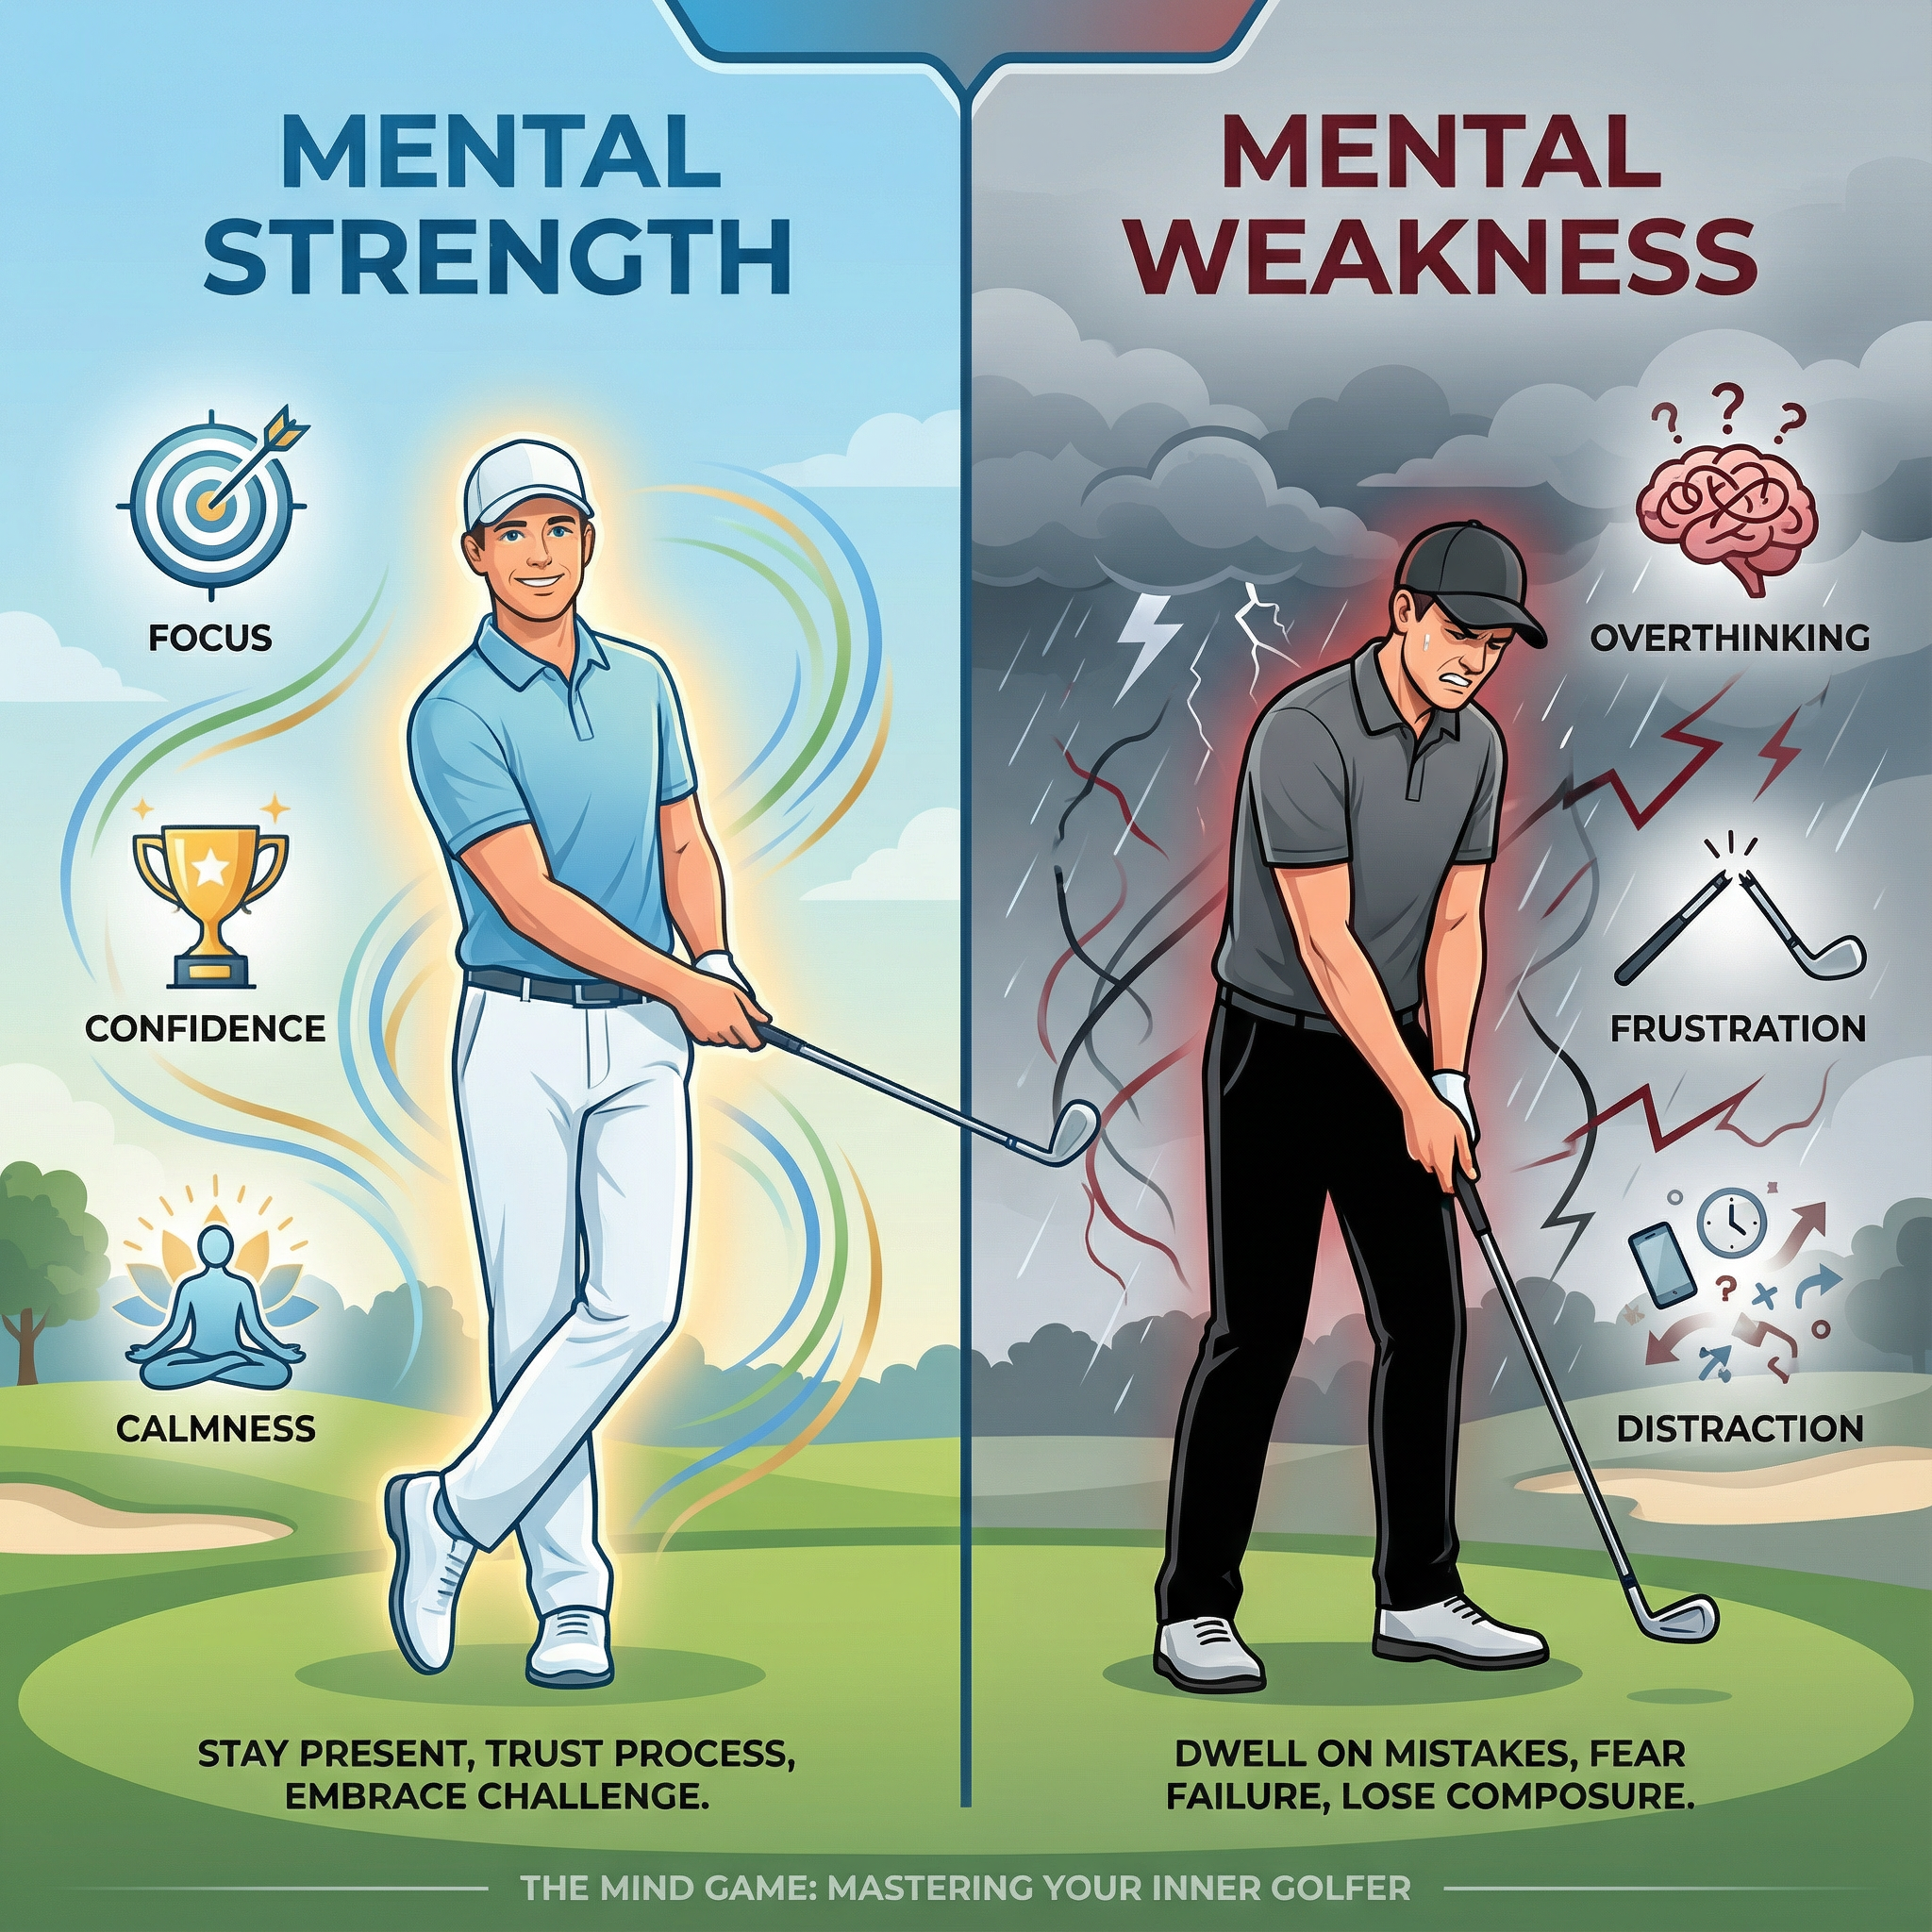
In golf, a quiet mind is a powerful asset. Your mental and emotional state directly influences your physical capabilities. When you are calm, focused, and confident, your body is relaxed, and your swing can flow freely and naturally. Conversely, when you are anxious, angry, or distracted, your muscles tighten, your coordination suffers, and your swing mechanics break down. This isn’t just a feeling; it’s a physiological reality. Negative emotions trigger a fight-or-flight response, which is fundamentally at odds with the fine motor control required for a successful golf shot .
A 2025 systematic review on mental fatigue in golf further highlights this connection. The research found that prolonged mental exertion during a round directly leads to a decline in performance, affecting everything from driving distance and iron accuracy to, most significantly, putting . Every decision, every calculation, and every moment of frustration depletes your cognitive resources, making it harder to execute shots as the round progresses. Mastering the mental game is therefore not just about thinking positively; it’s about efficiently managing your mental energy.
The 5 Mental Mistakes Costing You Strokes (and How to Fix Them)
Based on extensive analysis of amateur golfers, sports psychologists have identified several recurring mental errors. Here are five of the most common, along with strategies to overcome them, adapted from the work of mental game coach David MacKenzie .
Mental Mistake Description The Fix 1. Analyzing Your Swing Constantly dissecting your mechanics on the course, trying to “fix” your swing mid-round. Trust the swing you brought. The course is for playing, the range is for practicing. Focus on your target and let your body execute. If you need a swing thought, use a simple rhythm cue like “one-two-three.” 2. Obsessing Over Score Tying your emotional state to your score on every hole, leading to a rollercoaster of feelings. Focus on the process, not the outcome. Your goal for each shot should be to execute your routine flawlessly. The score will take care of itself. 3. Negative Self-Talk Berating yourself after a bad shot, which lowers confidence and increases tension. Become your own best caddy. After a poor shot, offer yourself the same encouragement you would a friend. Develop a post-shot routine that involves acknowledging the feeling, taking a deep breath, and moving on. 4. Vague Targeting Aiming for a general area like “the fairway” or “the green” instead of a specific point. Pick the smallest possible target. Top professionals aim at incredibly precise spots, like a specific tree branch or a single blade of grass. This sharpens focus and improves accuracy. 5. Neglecting Your Routine Lacking a consistent pre-shot and post-shot routine, leading to inconsistent mental preparation and reaction. Make your routine your primary goal. A well-defined routine is your mental armor against pressure. It ensures you are committed to every shot and can handle any outcome.
Building an Unshakeable Mental Game: Pro-Level Techniques
Top professional golfers are masters of the mental game. They employ specific techniques to stay focused, confident, and resilient under immense pressure. Here are a few you can incorporate into your own game.
The Power of a “Pre-Shot Creation”
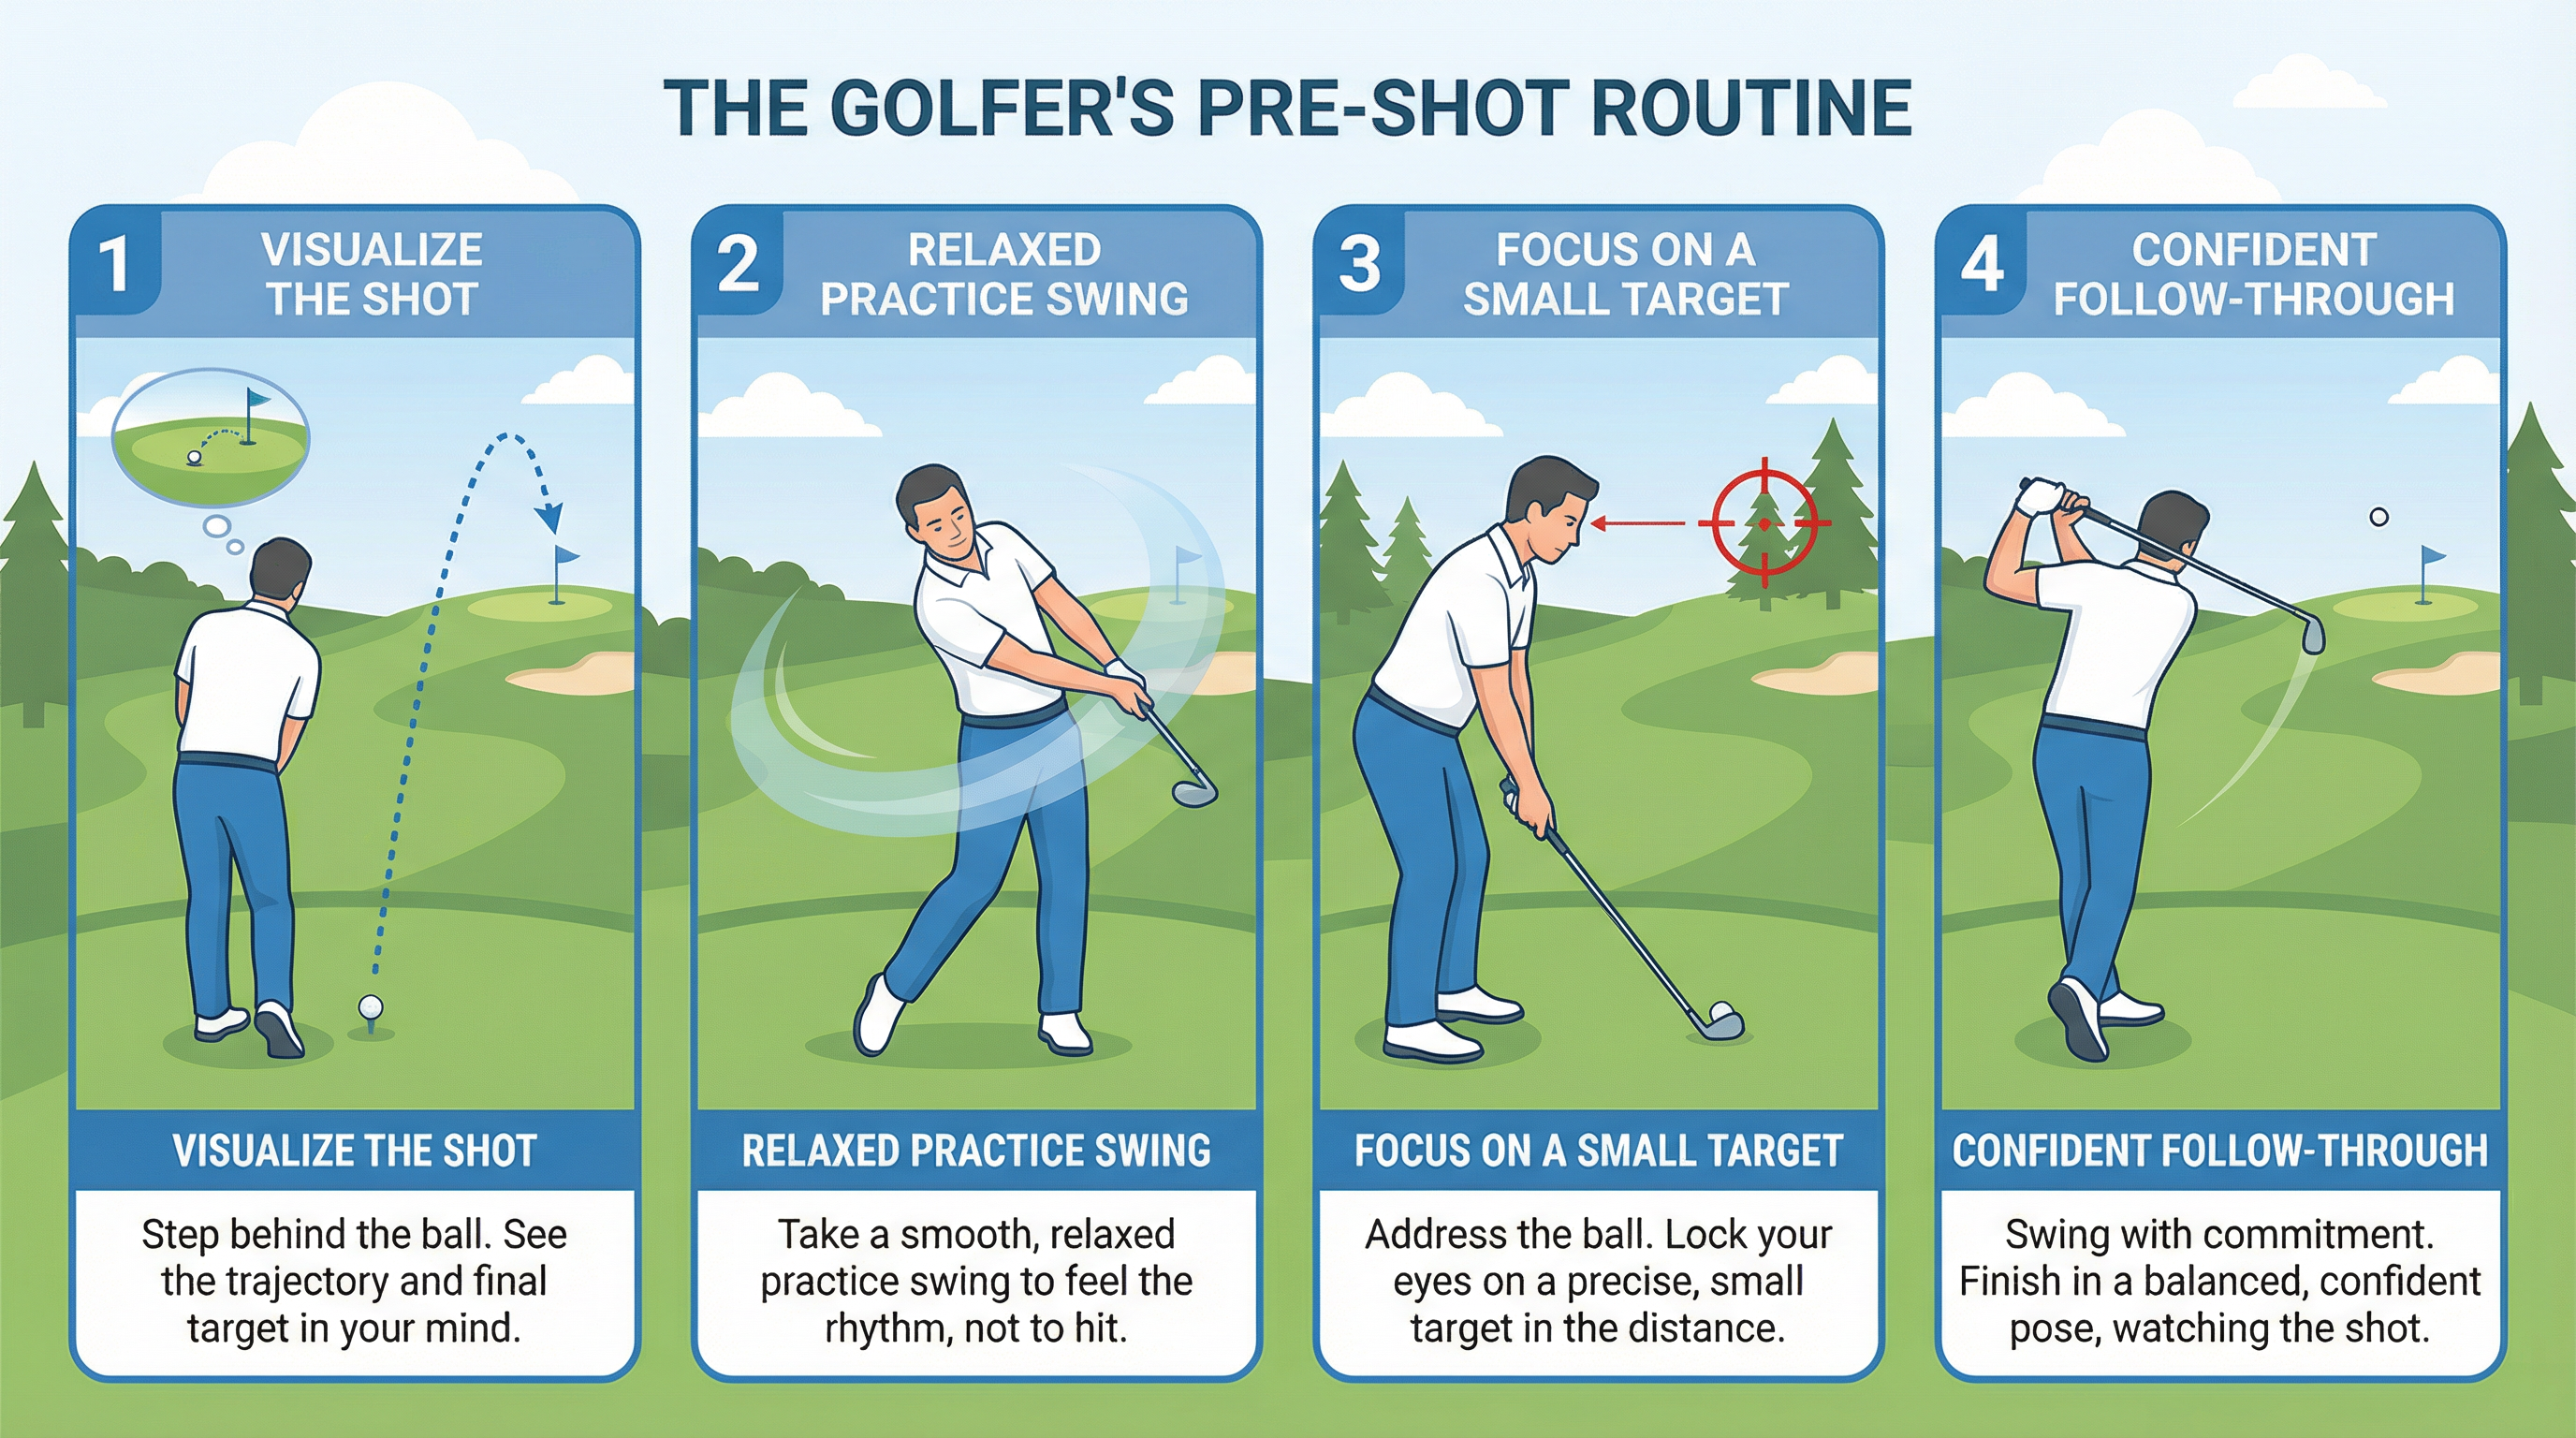
Instead of a rigid, robotic pre-shot routine, think of it as a “pre-shot creation.” This concept, inspired by the approach of players like Tiger Woods, reframes the process as an artistic and imaginative one . Rather than just going through the motions, you should feel the shot, engage your senses, and become genuinely interested in the unique puzzle each shot presents. This fosters a state of deep presence and curiosity, quieting the analytical mind.
Tiger Woods worked extensively with navy psychologist Dr. Jay Brunza early in his career, developing what he called “game training.” Woods emphasized the importance of bringing attention to “THIS SHOT in THIS moment” and described feeling the shot in his fingers rather than relying solely on visualization. At his best, Woods found a way to be immensely interested in each shot, playing from a position of curiosity rather than anxiety .
Mastering Your Mind: Awareness Over Control
One of the biggest paradoxes in golf psychology is that trying to control your thoughts often backfires. Telling yourself “don’t hit it in the water” only makes the water a more prominent feature in your mind . The key is not to suppress negative thoughts but to change your relationship with them through mindfulness and awareness. Acknowledge the thought without judgment, and then gently guide your focus back to your target and your breathing. The best players don’t have fewer negative thoughts; they are simply more skilled at not letting them take over.
Research shows that the average person has approximately 70,000 thoughts per day, with more than two-thirds being negative . The difference between elite golfers and amateurs is not the quantity of negative thoughts but how they respond to them. Elite players have developed the skill of awareness—noticing thoughts without becoming entangled in them—allowing the thoughts to pass like clouds in the sky.
Breathe Like a Champion
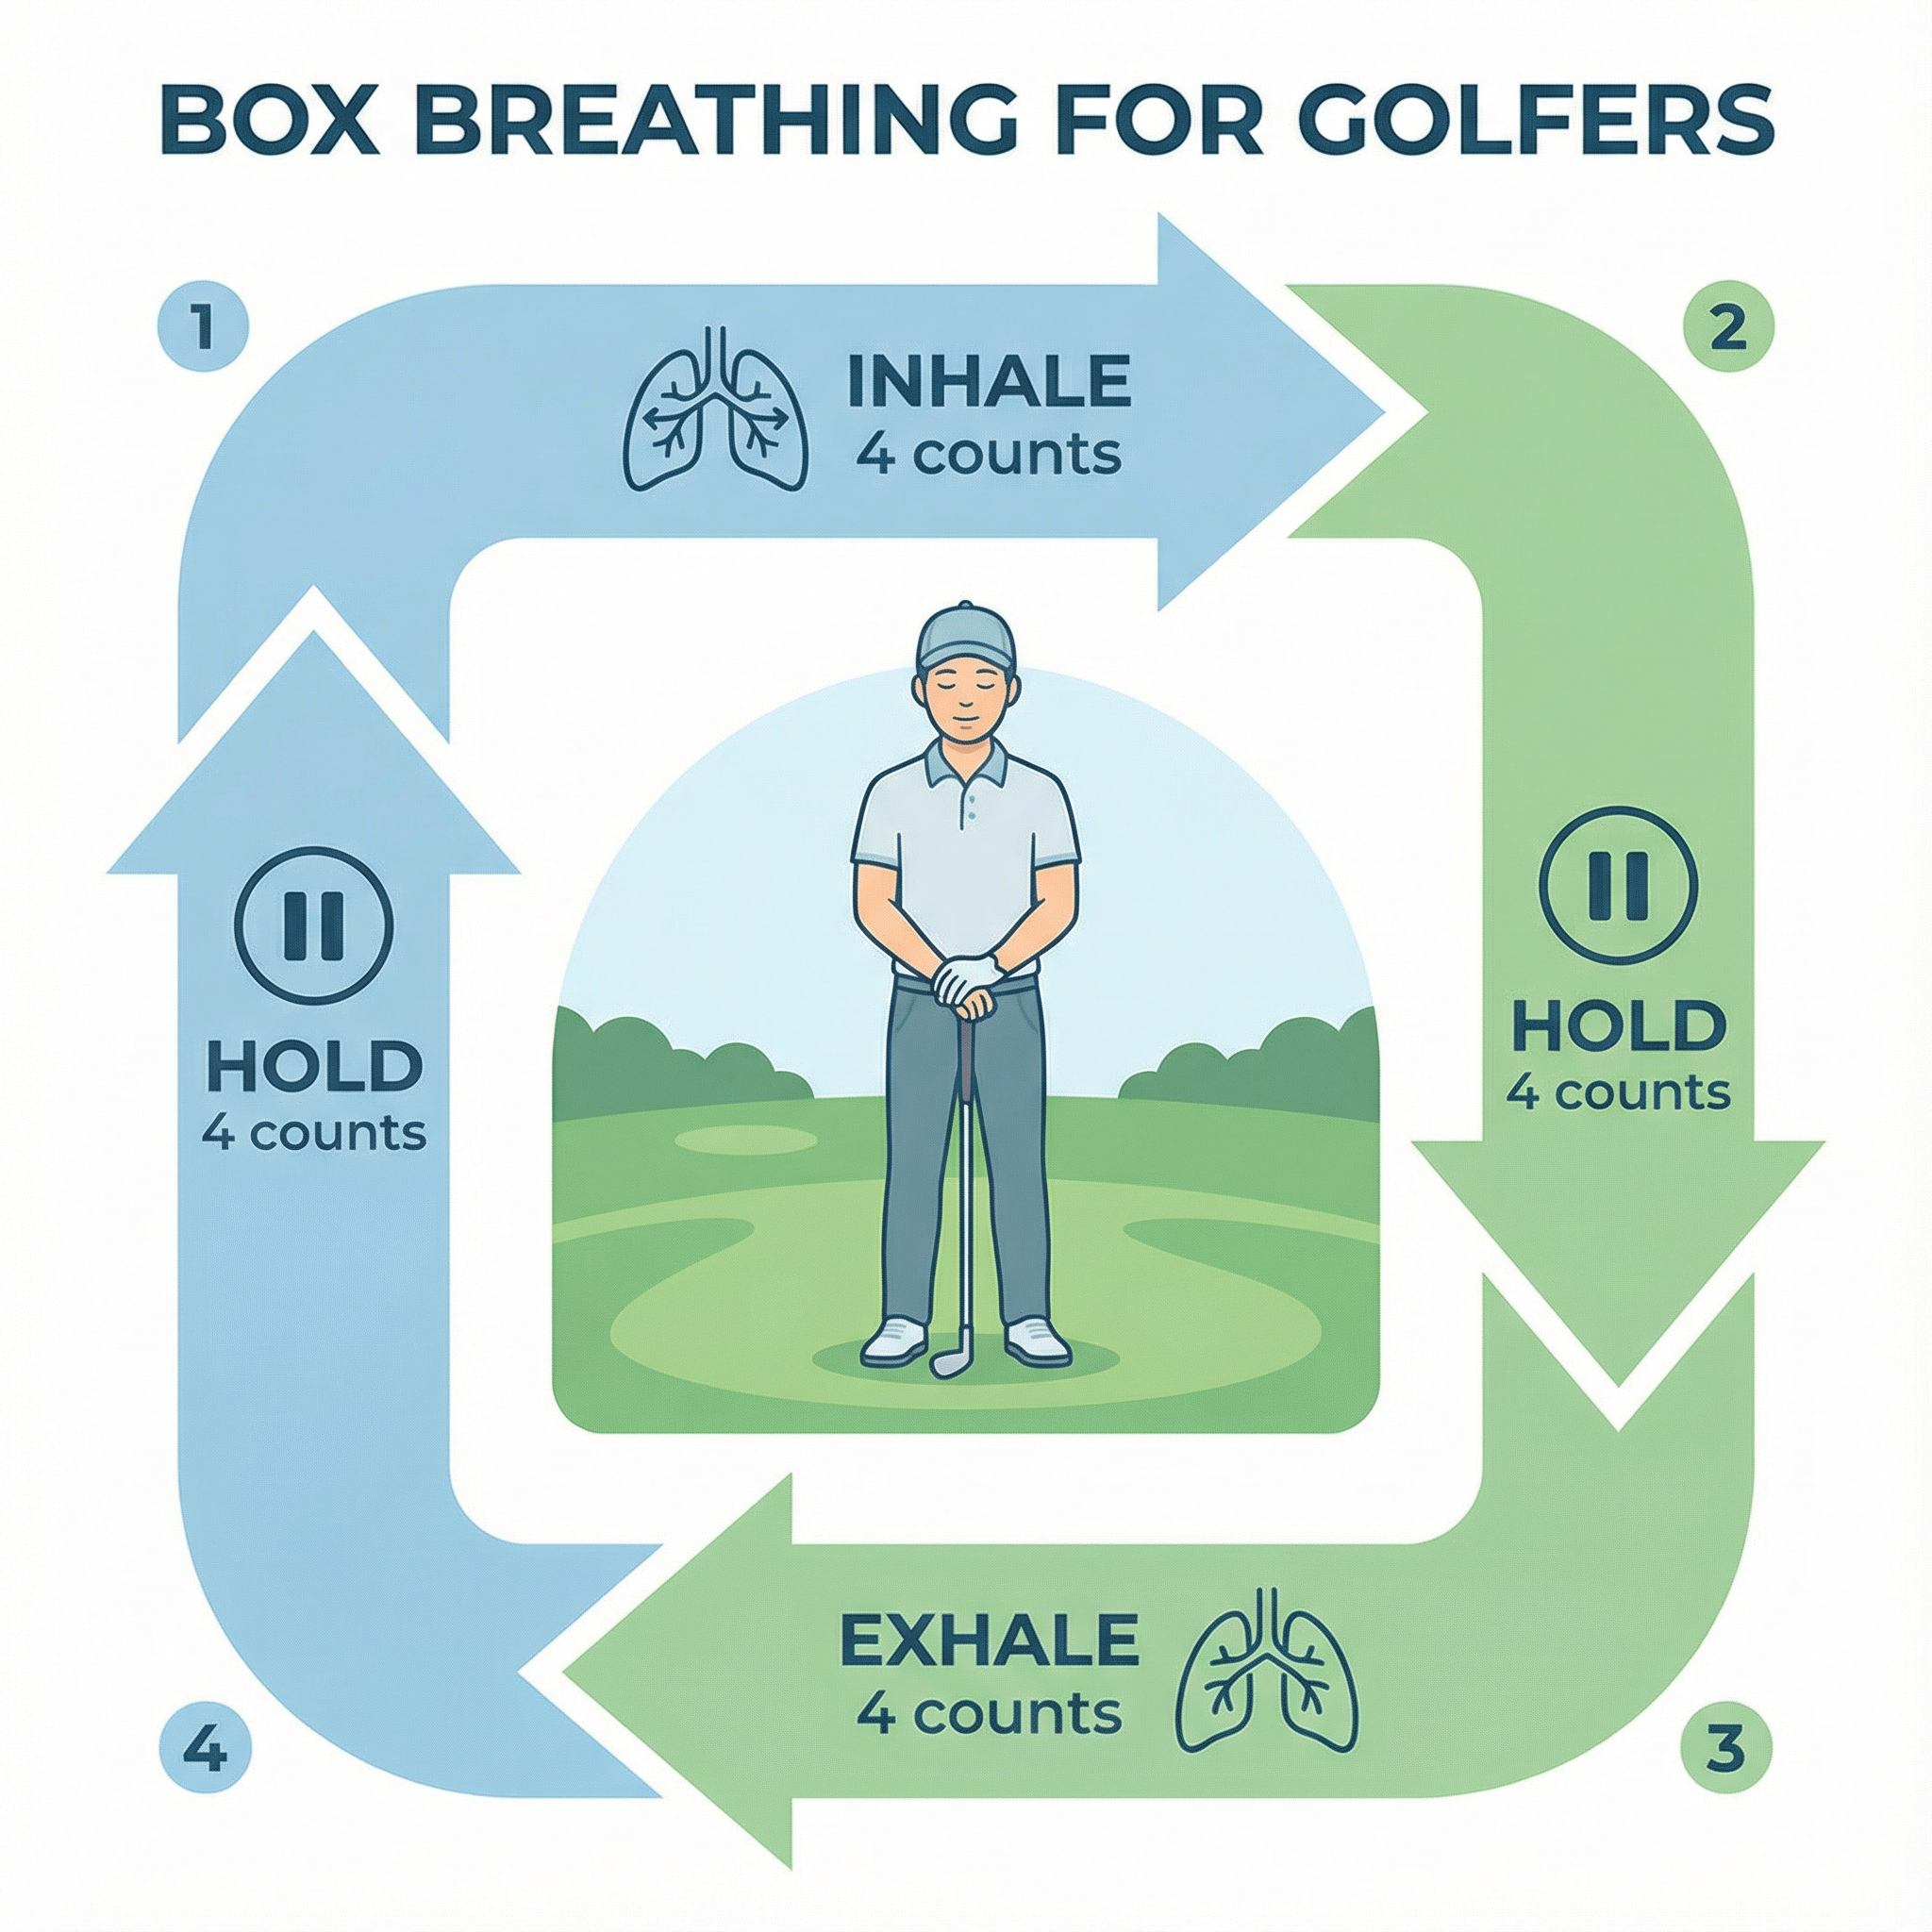
Breathing is one of the most powerful and simple tools for managing your physiological state. When you feel pressure mounting, your breathing becomes shallow and rapid. By consciously slowing it down, you can signal to your nervous system that it’s time to calm down. A popular and effective technique is Box Breathing:
1.Inhale slowly for a count of four.
2.Hold your breath for a count of four.
3.Exhale slowly for a count of four.
4.Hold your breath for a count of four.
Repeating this cycle just a few times can significantly lower your heart rate and reduce muscle tension, allowing you to approach the shot from a state of calm focus .
The Science Behind Mental Training
Recent research validates what professional golfers have known intuitively for decades. A brain training study conducted with UCLA Golf demonstrated remarkable results: participants increased their greens in regulation by 12% and decreased three-putts per round by 9.7%. Perhaps most impressively, these improvements were sustained eight weeks after the training concluded . This demonstrates that mental skills, like physical skills, can be trained and improved with consistent practice.
A 2024 neuroscience study revealed that expert golfers exhibit distinct brain activity patterns during successful putts compared to unsuccessful ones. The research emphasized that mental preparation—not just physical technique—is the key differentiator between making and missing putts . This finding underscores the importance of developing a consistent mental routine before every shot.
Putting It Into Practice: Drills for a Stronger Mind
Improving your mental game requires consistent practice, just like your swing. Here are a few drills you can incorporate into your routine:
Pressure Putting Drill: Place three balls at 3, 6, and 9 feet from the hole. You must make all three in a row to complete the drill. If you miss, you start over. This simulates pressure and forces you to focus on your routine for each putt. As you improve, increase the difficulty by adding more balls or extending the distances.
Mindfulness on the Range: During your practice sessions, take a few moments between shots to simply be present. Feel the grip in your hands, notice the breeze, and listen to the sounds around you. This trains your ability to stay in the present moment, which is essential for peak performance on the course.
Post-Round Journaling: After each round, take five minutes to write down one thing you did well mentally and one mental challenge you faced. This builds self-awareness and helps you identify patterns in your mental game. Over time, you will notice recurring themes that you can address in your practice.
Target Practice with Consequences: On the range, pick a specific target for every shot—not just a general area. If you miss your target, perform a small penalty like five push-ups or hitting the next shot with your opposite hand. This adds consequences to your practice, making it more similar to on-course conditions where every shot matters.
Key Takeaways for Your Next Round
As you prepare for your next round, keep these fundamental principles in mind:
Trust over control. The more you try to consciously control your swing, the more tension you create. Trust the swing you have practiced and let your body execute naturally.
Process over outcome. Make your pre-shot routine your primary goal for every shot. When you focus on executing your process flawlessly, good scores follow naturally.
Awareness over suppression. You cannot eliminate negative thoughts, but you can change your relationship with them. Notice them, acknowledge them, and gently return your focus to the present moment.
Precision over generality. Always pick the smallest possible target. This sharpens your focus and gives your subconscious mind a clear objective.
Compassion over criticism. Treat yourself with the same kindness and encouragement you would offer a playing partner. Negative self-talk only compounds mistakes and drains your confidence.
Conclusion
The journey to mastering the mental game of golf is ongoing, but it is one of the most rewarding pursuits in the sport. By understanding the profound impact of your mind on your performance, recognizing common mental errors, and consistently practicing proven psychological techniques, you can unlock a new level of consistency, resilience, and enjoyment on the golf course. Remember, the next time you step onto the tee, your most powerful tool isn’t in your bag—it’s in your head. The difference between a good round and a great round often comes down to how well you manage the six inches between your ears.
Start small. Pick one technique from this article—perhaps developing a consistent pre-shot routine or practicing Box Breathing before important shots—and commit to it for your next three rounds. Track your progress, notice the changes, and gradually incorporate additional mental skills into your game. The mental game is not a quick fix, but a lifelong practice that will serve you well both on and off the course.
References
[1] NeuroTrackerX. (2023, December 1). Why Golf Performance is 90% Mental.
[2] McCarthy, P. (2025, November 8). The Mental Game of Golf: Pro Secrets You Haven’t Heard Before.
[3] Colorado Senior Golfers’ Association. The Brain Game – Spring Edition.
[4] McCarthy, P. (2025, November 8). The Mental Game of Golf: Pro Secrets You Haven’t Heard Before.
[5] Pan, X., et al. (2025). Mental fatigue in golf: A systematic review. PLOS ONE.
[7] Mind Caddie. (2025, November 9). Tiger Woods’ Mental Strategies.
[9] MyTPI. Mental Game: Brain Training Study With UCLA Golf.
[10] PsyPost. (2024, August 15). Golf: New neuroscience study reveals the secrets of better putting.
Blog
Stop Wasting Strokes: 5 Simple Drills to Kill the Dreaded 3-Putt
Tired of ruining a great hole with the dreaded 3-putt? These 5 simple drills fix your speed, conquer pressure, and turn three putts into two.

There is no feeling in golf quite as demoralizing as the 3-putt.
You smash a perfect drive. You hit a pure iron shot that lands safely on the green. You’re feeling like a pro, walking up to your ball with a birdie on your mind.
Then, disaster strikes. You blaze the first putt eight feet past the hole. Your comebacker for par is a nervous, jabby stroke that lips out. You tap in for a bogey, walking off the green with that all-too-familiar feeling of frustration, your good shots completely wasted.
The 3-putt is the great scorecard killer. It’s the difference between breaking 90 and shooting 95. The good news? It’s almost always the easiest problem to fix. It’s not about buying a $500 putter; it’s about controlling your speed and handling pressure.
Here are 5 simple, time-tested drills to kill the 3-putt and make you a confident force on the greens.
Why You 3-Putt (It’s Not What You Think)
Most amateurs 3-putt for two simple reasons, and neither has to do with a “bad stroke”:
- Poor Lag Putting: You leave your first putt so far from the hole that the second putt is still a challenge.
- Missed “Knee-Knockers”: You can’t consistently sink putts inside 3-5 feet.
These five drills are designed to fix both of those problems, starting today.
5 Drills to Become a 2-Putt Machine
Find a practice green and spend 20 minutes on these. You’ll see results in your very next round.
1. The Ladder Drill (For Lag Control)
This is the ultimate drill for dialing in your speed control.
- How to do it: Place three balls at 20, 30, and 40 feet from a hole (or use tees if you’re just practicing speed).
- The Goal: Hit the 20-foot putt, then the 30-foot, then the 40-foot. Your only goal is to get all three putts to stop within a 3-foot radius of the hole (imagine a hula-hoop around the cup).
- Why it works: It trains your brain to instinctively understand how hard to hit a putt based on distance. You’ll stop blazing putts 10 feet by or leaving them 10 feet short.
2. The Clock Drill (For Short Putt Pressure)
You must be automatic from three feet. This drill adds the pressure you feel on the course.
- How to do it: Place 12 balls in a 3-foot circle around the hole (like the numbers on a clock).
- The Goal: Go around the clock and make all 12 putts in a row. If you miss one, you must start over from the beginning.
- Why it works: It’s not just about mechanics; it’s about focus. When you get to ball #10, you will feel the pressure. This simulates the feeling of having to make a putt for par.
3. The Gate Drill (For a Pure Roll)
Missed short putts are often caused by a poor starting line. This drill gives you instant feedback.
- How to do it: Find a straight, 5-foot putt. Place two tees on the ground just wide enough for your putter head to pass through. About a foot in front of your ball, place two more tees just slightly wider than the ball itself.
- The Goal: Stroke the putter through the first “gate” and roll the ball through the second “gate.”
- Why it works: If you hit the ball off-center or have a wobbly stroke, the ball will hit the second gate. It forces you to hit the sweet spot and start the ball exactly where you’re aiming.
4. The 100-Footer (The “No 3-Putt” Zone)
This drill is simple: go to one end of the practice green and putt to a hole on the opposite end. Your goal is not to make it, but to get it inside that imaginary 3-foot circle. Do this 10 times. This makes 30 and 40-footers on the course feel like tap-ins by comparison.
5. The “Read, Roll, and React” Drill
Stop agonizing over every putt. This drill teaches you to trust your first instinct.
- How to do it: Take three balls to a 25-foot breaking putt.
- The Goal: You have 20 seconds total. In that time, you must read the green, take one practice stroke, and hit all three putts.
- Why it works: It stops “paralysis by analysis.” It trains you to pick a line, trust your speed, and accept the result. You’ll be amazed at how much better your instincts are than your over-analytical brain.
It’s About Process, Not Perfection
You’re still going to 3-putt occasionally. Even the pros do. But by practicing these drills, you’ll be building confidence and skill. You’ll stop fearing long putts and start knowing you can get them close. That confidence is the real secret to finally killing the 3-putt for good.
Blog
The Mental Game: How to Stay Calm Under Pressure on the Golf Course
Master the mental side of golf with proven strategies to stay calm under pressure and play your best when it matters most.

Golf is often called a mental game, and for good reason. While physical technique is important, the difference between a good round and a great round often comes down to what happens between your ears. I’ve seen golfers with beautiful swings fall apart under pressure, and I’ve watched players with less-than-perfect technique shoot amazing scores because they had their mental game dialed in.
The mental challenges in golf are unique. Unlike other sports where you react instinctively to changing situations, golf gives you time to think – sometimes too much time. Standing over a shot with water on the left and bunkers on the right, you have plenty of opportunity to imagine all the things that could go wrong. Learning to manage these thoughts and emotions is crucial for consistent performance.
Understanding Golf Pressure
Pressure in golf comes in many forms. There’s the pressure of playing well in front of others, the pressure of a tight match, the pressure of trying to break your personal best score, or simply the pressure of hitting a good shot after several poor ones. The key is recognizing that pressure is normal and learning to work with it rather than against it.
Physical symptoms of pressure include increased heart rate, sweaty palms, tight muscles, and shallow breathing. These are natural responses, but they can interfere with your golf swing if not managed properly. The first step in handling pressure is acknowledging these feelings rather than trying to ignore them.
Developing a Pre-Shot Routine
A consistent pre-shot routine is your best defense against pressure and negative thoughts. This routine should be the same for every shot, whether you’re hitting a driver on the first tee or a crucial putt to win a match. Your routine creates a familiar pattern that helps calm your mind and prepare your body for the shot ahead.
Your pre-shot routine should include both physical and mental elements. Physically, you might take a practice swing, check your alignment, and take a deep breath. Mentally, you should visualize the shot you want to hit and commit fully to that image. The key is making this routine automatic so it works even when you’re nervous.
Visualization is a powerful tool that many golfers underutilize. Before each shot, create a clear mental picture of the ball flying toward your target and landing exactly where you want it. See the trajectory, feel the solid contact, and imagine the positive result. This positive imagery helps crowd out negative thoughts and gives your subconscious mind a clear target to work toward.
Course Management Psychology
Smart course management is as much about psychology as it is about strategy. Playing within your abilities and making conservative choices when appropriate can actually boost your confidence and lead to better scores. There’s no shame in laying up short of a water hazard or aiming for the center of the green instead of attacking a tight pin position.
The key is honest self-assessment. Know your strengths and limitations, and plan your shots accordingly. If you’re not comfortable hitting a 3-iron, don’t try to hit one under pressure. If you struggle with draws, don’t attempt one when a fade will work just as well. Playing to your strengths builds confidence and reduces the likelihood of big mistakes.
Risk versus reward decisions should be made with your head, not your ego. Before attempting any risky shot, ask yourself: “What’s the best possible outcome, what’s the worst possible outcome, and what’s most likely to happen?” If the potential downside significantly outweighs the potential benefit, choose the safer option.
Dealing with Bad Shots and Bad Rounds
Every golfer hits bad shots and has bad rounds – it’s part of the game. The difference between good players and great players is often how quickly they recover from mistakes. Dwelling on a bad shot or getting angry about a poor result only makes it more likely that you’ll hit more bad shots.
Develop a short memory for bad shots. Allow yourself to feel disappointed for a few seconds, then let it go and focus on the next shot. Some golfers find it helpful to have a physical routine for releasing frustration, such as taking a deep breath and exhaling slowly, or making a practice swing to reset their feel.
Learn from mistakes without dwelling on them. If you hit a shot into the water, quickly analyze what went wrong (poor club selection, bad swing, mental error), make a mental note for future reference, then move on. The lesson is valuable, but continuing to think about it will only hurt your performance on subsequent shots.
Building Confidence
Confidence in golf is built through preparation and positive experiences. The more you practice and the more you understand your capabilities, the more confident you’ll feel on the course. Keep a record of your good shots and good rounds to remind yourself of your abilities when doubt creeps in.
Set realistic, achievable goals for each round. Instead of trying to shoot your career best every time out, focus on process goals like hitting a certain number of fairways or avoiding three-putts. These goals are more within your control and help build confidence through achievement.
Positive self-talk is crucial for maintaining confidence. Replace negative thoughts like “Don’t hit it in the water” with positive ones like “Hit it to the center of the green.” Your subconscious mind responds better to positive instructions than negative warnings.
Staying Present and Focused
One of the biggest mental challenges in golf is staying in the present moment. It’s easy to get ahead of yourself, thinking about what score you might shoot or worrying about difficult holes coming up. It’s equally easy to get stuck in the past, replaying bad shots or dwelling on missed opportunities.
The solution is to focus on one shot at a time. This isn’t just a cliché – it’s a practical mental strategy that keeps you grounded in the present moment. Before each shot, remind yourself that this shot is the only one that matters right now. The shots you’ve already hit are history, and the shots you haven’t hit yet don’t exist.
Breathing exercises can help you stay calm and focused. Before important shots, take a slow, deep breath in through your nose and exhale slowly through your mouth. This activates your parasympathetic nervous system, which helps calm your mind and relax your body.
Conclusion: Developing Mental Toughness
Mental toughness in golf isn’t about being emotionless or never feeling pressure. It’s about acknowledging these feelings and having strategies to deal with them effectively. Like physical skills, mental skills improve with practice and attention.
Start incorporating mental training into your practice routine. Spend time visualizing successful shots, practice your pre-shot routine, and work on staying positive even when things don’t go as planned. The mental game might not be as visible as your swing mechanics, but it’s just as important for shooting lower scores and enjoying golf more.
Remember that even the best players in the world struggle with the mental side of golf sometimes. The difference is that they have developed tools and strategies to help them work through these challenges. With practice and patience, you can develop these same mental skills and take your game to the next level.
-

 Product Review6 years ago
The Perfect Practice Putting Mat Review by Jason Tenzer
-

 Blog4 years ago
Loophole Rule Offers PGA Tour Pros a Mulligan
-

 Blog4 years ago
2021 Buyer’s Guide: The Top 10 Value Golf Balls For Distance & Feel
-

 Blog5 years ago
Golf Marriage Counselor
-

 Blog6 years ago
9 Biggest Chokes Of The Past Decade
-

 Product Review6 years ago
THE ADJUSTABLE IRONS: WALKING STICKS GOLF CLUBS
-

 Blog4 years ago
What Your Golf Clubs Say About You
-

 Equipment6 years ago
OHK Sports Interview by Jason Tenzer


