Connect with us

Drills

Golf Fitness for the Off-Season: Build Strength, Flexibility, and Power Before Spring

Now is the time to get in shape before the season starts. Start your routine now so you can be ready.

Avatar photo

Published

on

As the days grow shorter and the golf courses are covered in a blanket of frost or snow, it’s easy to let your clubs gather dust in the garage. But what if this winter off-season wasn’t an end, but a beginning? What if you could use these next few months to build a stronger, more flexible, and more powerful body, emerging in the spring not just rust-free, but fundamentally better than you were last season?

Welcome to your off-season game plan. This isn’t about grueling, two-hour gym sessions. This is a smart, targeted approach to golf fitness that will increase your clubhead speed, improve your consistency, and dramatically reduce your risk of injury. By focusing on the three pillars of athletic performance—Mobility, Strength, and Power—you can transform your game without ever hitting a ball.

Why Off-Season Fitness is a Game-Changer

During the golf season, our focus is on playing. It’s difficult to make significant physical gains when your body is also trying to recover from rounds and practice sessions. The off-season, however, presents a golden opportunity. It’s a dedicated block of time where you can push your body, build a solid foundation, and make improvements that are simply not possible mid-season .

Furthermore, the physical qualities required for a powerful and resilient golf swing are the exact same qualities essential for long-term health and vitality. As we age, we naturally lose muscle mass, strength, and power—a process that is catastrophic for both our golf game and our quality of life. The good news? All of these factors are incredibly trainable at any age. Research on adults aged 60 to 83 years found that just 8-16 weeks of resistance training improved maximal strength by approximately 18% and rate of force development by 27% . The workout that adds 15 yards to your drive is the same one that helps you carry groceries with ease and stay independent for decades to come.

The Three Pillars of a Powerful Golf Swing

A successful golf fitness program doesn’t need to be complicated. It should be built on a consistent and progressive approach focused on three key areas.

The three pillars of golf fitness

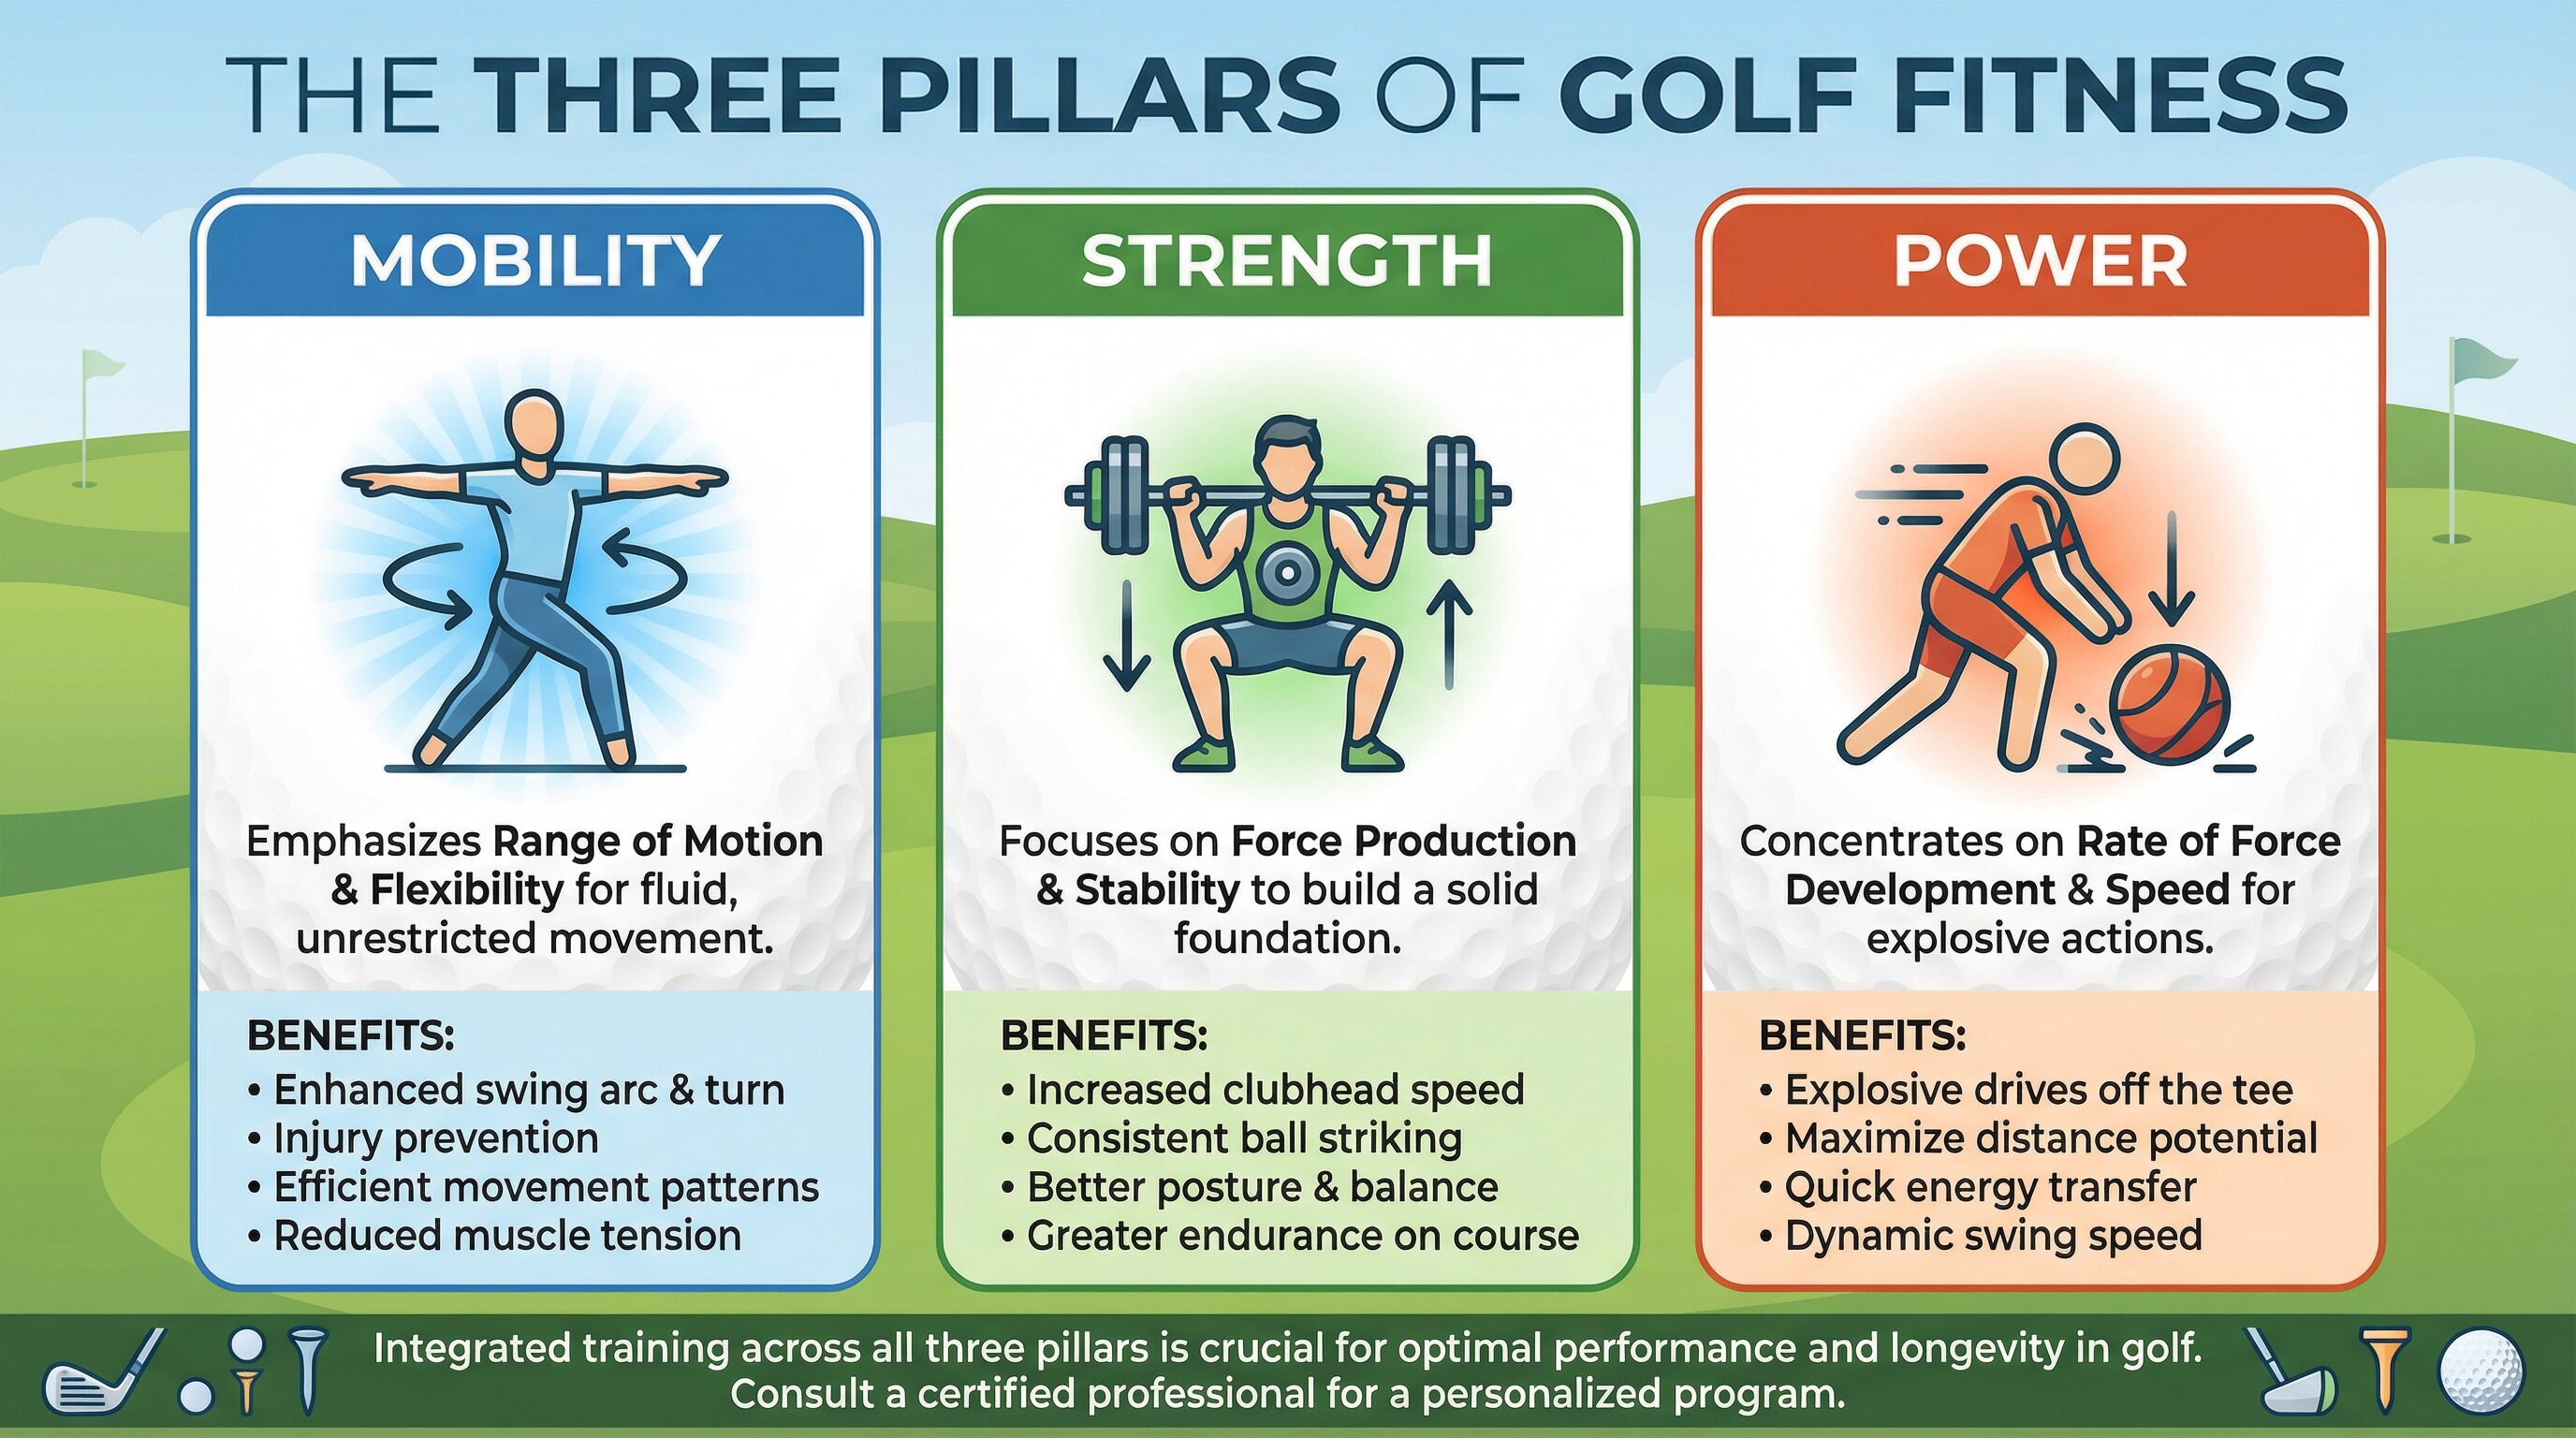
Pillar 1: Mobility – The Foundation of a Fluid Swing

Mobility is the ability to move a joint through its full range of motion with control. For golfers, this is non-negotiable. Without adequate mobility in your hips, thoracic spine (upper back), and shoulders, your body will be forced to find that rotation from other, less stable areas, like your lower back—a leading cause of golf-related pain and injury.

Why it Matters: A bigger turn in your backswing creates a longer arc, which directly translates to more clubhead speed. How much you turn your pelvis and torso, and how far your hands travel around the clock in the backswing, play a very important role in your club head speed . Improved mobility allows you to generate this rotation safely and efficiently.

The Focus: Hips, Thoracic Spine, Shoulders. The beauty of mobility training is that it doesn’t require any equipment, is not very taxing, and the gains are immediate. It doesn’t even require much training time.

Key golf mobility exercises demonstration

Pillar 2: Strength – The Engine of Your Swing

Strength is the ability to produce force. It’s the engine that powers your golf swing. A stronger body is a more stable body, allowing you to maintain your posture and balance from address to follow-through. It’s also the foundation upon which you build power.

Why it Matters: Strength is essential for creating speed, controlling the club, and preventing the breakdown of swing mechanics due to fatigue over 18 holes. It is arguably the most underappreciated physical quality in the general population, and it requires specific training to maintain . Everyday tasks or just being active is not sufficient to preserve muscle strength as we age.

ADVERTISEMENT

ADVERTISEMENT

ADVERTISEMENT

ADVERTISEMENT

ADVERTISEMENT

ADVERTISEMENT

ADVERTISEMENT

ADVERTISEMENT

ADVERTISEMENT

ADVERTISEMENT

ADVERTISEMENT

ADVERTISEMENT

ADVERTISEMENT

ADVERTISEMENT

ADVERTISEMENT

ADVERTISEMENT

ADVERTISEMENT

ADVERTISEMENT

ADVERTISEMENT

ADVERTISEMENT

ADVERTISEMENT

ADVERTISEMENT

ADVERTISEMENT

ADVERTISEMENT

ADVERTISEMENT

ADVERTISEMENT

ADVERTISEMENT

ADVERTISEMENT

PING Hoofer

ADVERTISEMENT

ADVERTISEMENT

ADVERTISEMENT

ADVERTISEMENT

ADVERTISEMENT

ADVERTISEMENT

ADVERTISEMENT

The Focus: Full-body, compound movements like squats, hinges (deadlifts), presses, and rows. These exercises engage multiple muscle groups simultaneously, building functional strength that translates directly to the golf course.

Pillar 3: Power – Unleashing Your Speed

If strength is the size of your engine, power is how quickly you can rev it. In golf, this is known as Rate of Force Development (RFD)—how rapidly you can generate force. The golf swing is an explosive, athletic movement that happens in the blink of an eye. You don’t have time to gradually ramp up to maximum force; you need to be able to summon it instantly.

Why it Matters: RFD is the physical quality most closely correlated with clubhead speed. It declines more rapidly with age than strength or muscle mass, which is why explosive training is a critical, yet often overlooked, component of golf fitness . A minuscule percentage of adults train explosively, but those who do see dramatic improvements in their ability to generate speed.

The Focus: Explosive movements like medicine ball throws, jumps, and kettlebell swings. These exercises train your nervous system to recruit muscle fibers rapidly, creating the explosive power needed for a fast, powerful swing.

Your At-Home Off-Season Workout Plan

You don’t need a fancy gym membership to build a golf-ready body. This simple and effective workout can be done at home with minimal equipment (a few dumbbells or kettlebells and resistance bands are helpful).

Frequency: Perform this full-body workout 2-3 times per week on non-consecutive days.

Exercise CategoryExercise ExampleSets & RepsWhy It Helps Your Golf Game
1. Dynamic Warm-Up90/90 Hip Switches2 sets of 10 reps/sideImproves hip internal and external rotation, crucial for a powerful backswing and follow-through.
(Mobility)Cat-Cow2 sets of 10 repsMobilizes the spine, warming up the muscles of the back and core.
Thoracic Rotations (Quadruped)2 sets of 8 reps/sideIncreases rotation in the upper back, allowing for a bigger, safer turn away from the ball.
2. PowerMedicine Ball Rotational Slams3 sets of 5 reps/sideDevelops explosive power in the transverse (rotational) plane, mimicking the golf swing.
Box Jumps (or Broad Jumps)3 sets of 5 repsTrains lower body explosiveness and improves your ability to use the ground for power.
3. StrengthGoblet Squats3 sets of 8-10 repsBuilds lower body and core strength, essential for stability and power generation.
Dumbbell Bent-Over Rows3 sets of 8-10 repsStrengthens the back and shoulders, helping to maintain posture throughout the swing.
Glute Bridges3 sets of 12-15 repsActivates and strengthens the glutes, the most powerful muscles in your body and key for a stable swing.
4. CorePallof Press3 sets of 10 reps/sideAn anti-rotation exercise that builds incredible core stability to resist unwanted movement during the swing.
Dead Bug3 sets of 10 reps/sideImproves coordination and strengthens the deep core muscles that protect your lower back.

Progression: Start at an appropriate level for your current fitness, and slowly and gradually increase the demand of the training as you improve. This principle of progressive overload is the key to long-term gains.

Injury Prevention: Play Smarter, Not Harder

The repetitive nature of the golf swing can take a toll on the body. The most common injuries are not acute, sudden events, but chronic overuse issues that build up over time . The lower back, wrists, and elbows are particularly vulnerable.

“People often think swinging a golf club is just about the arms and shoulders, but it’s really a total body workout,” explains Dr. Daniel Komlos, an orthopedic surgeon at Houston Methodist. “Building strength is also critical for injury prevention, since the repetitive motions and prolonged gripping that come with playing golf can take a toll on your muscles and joints.”

Golf injury prevention guide

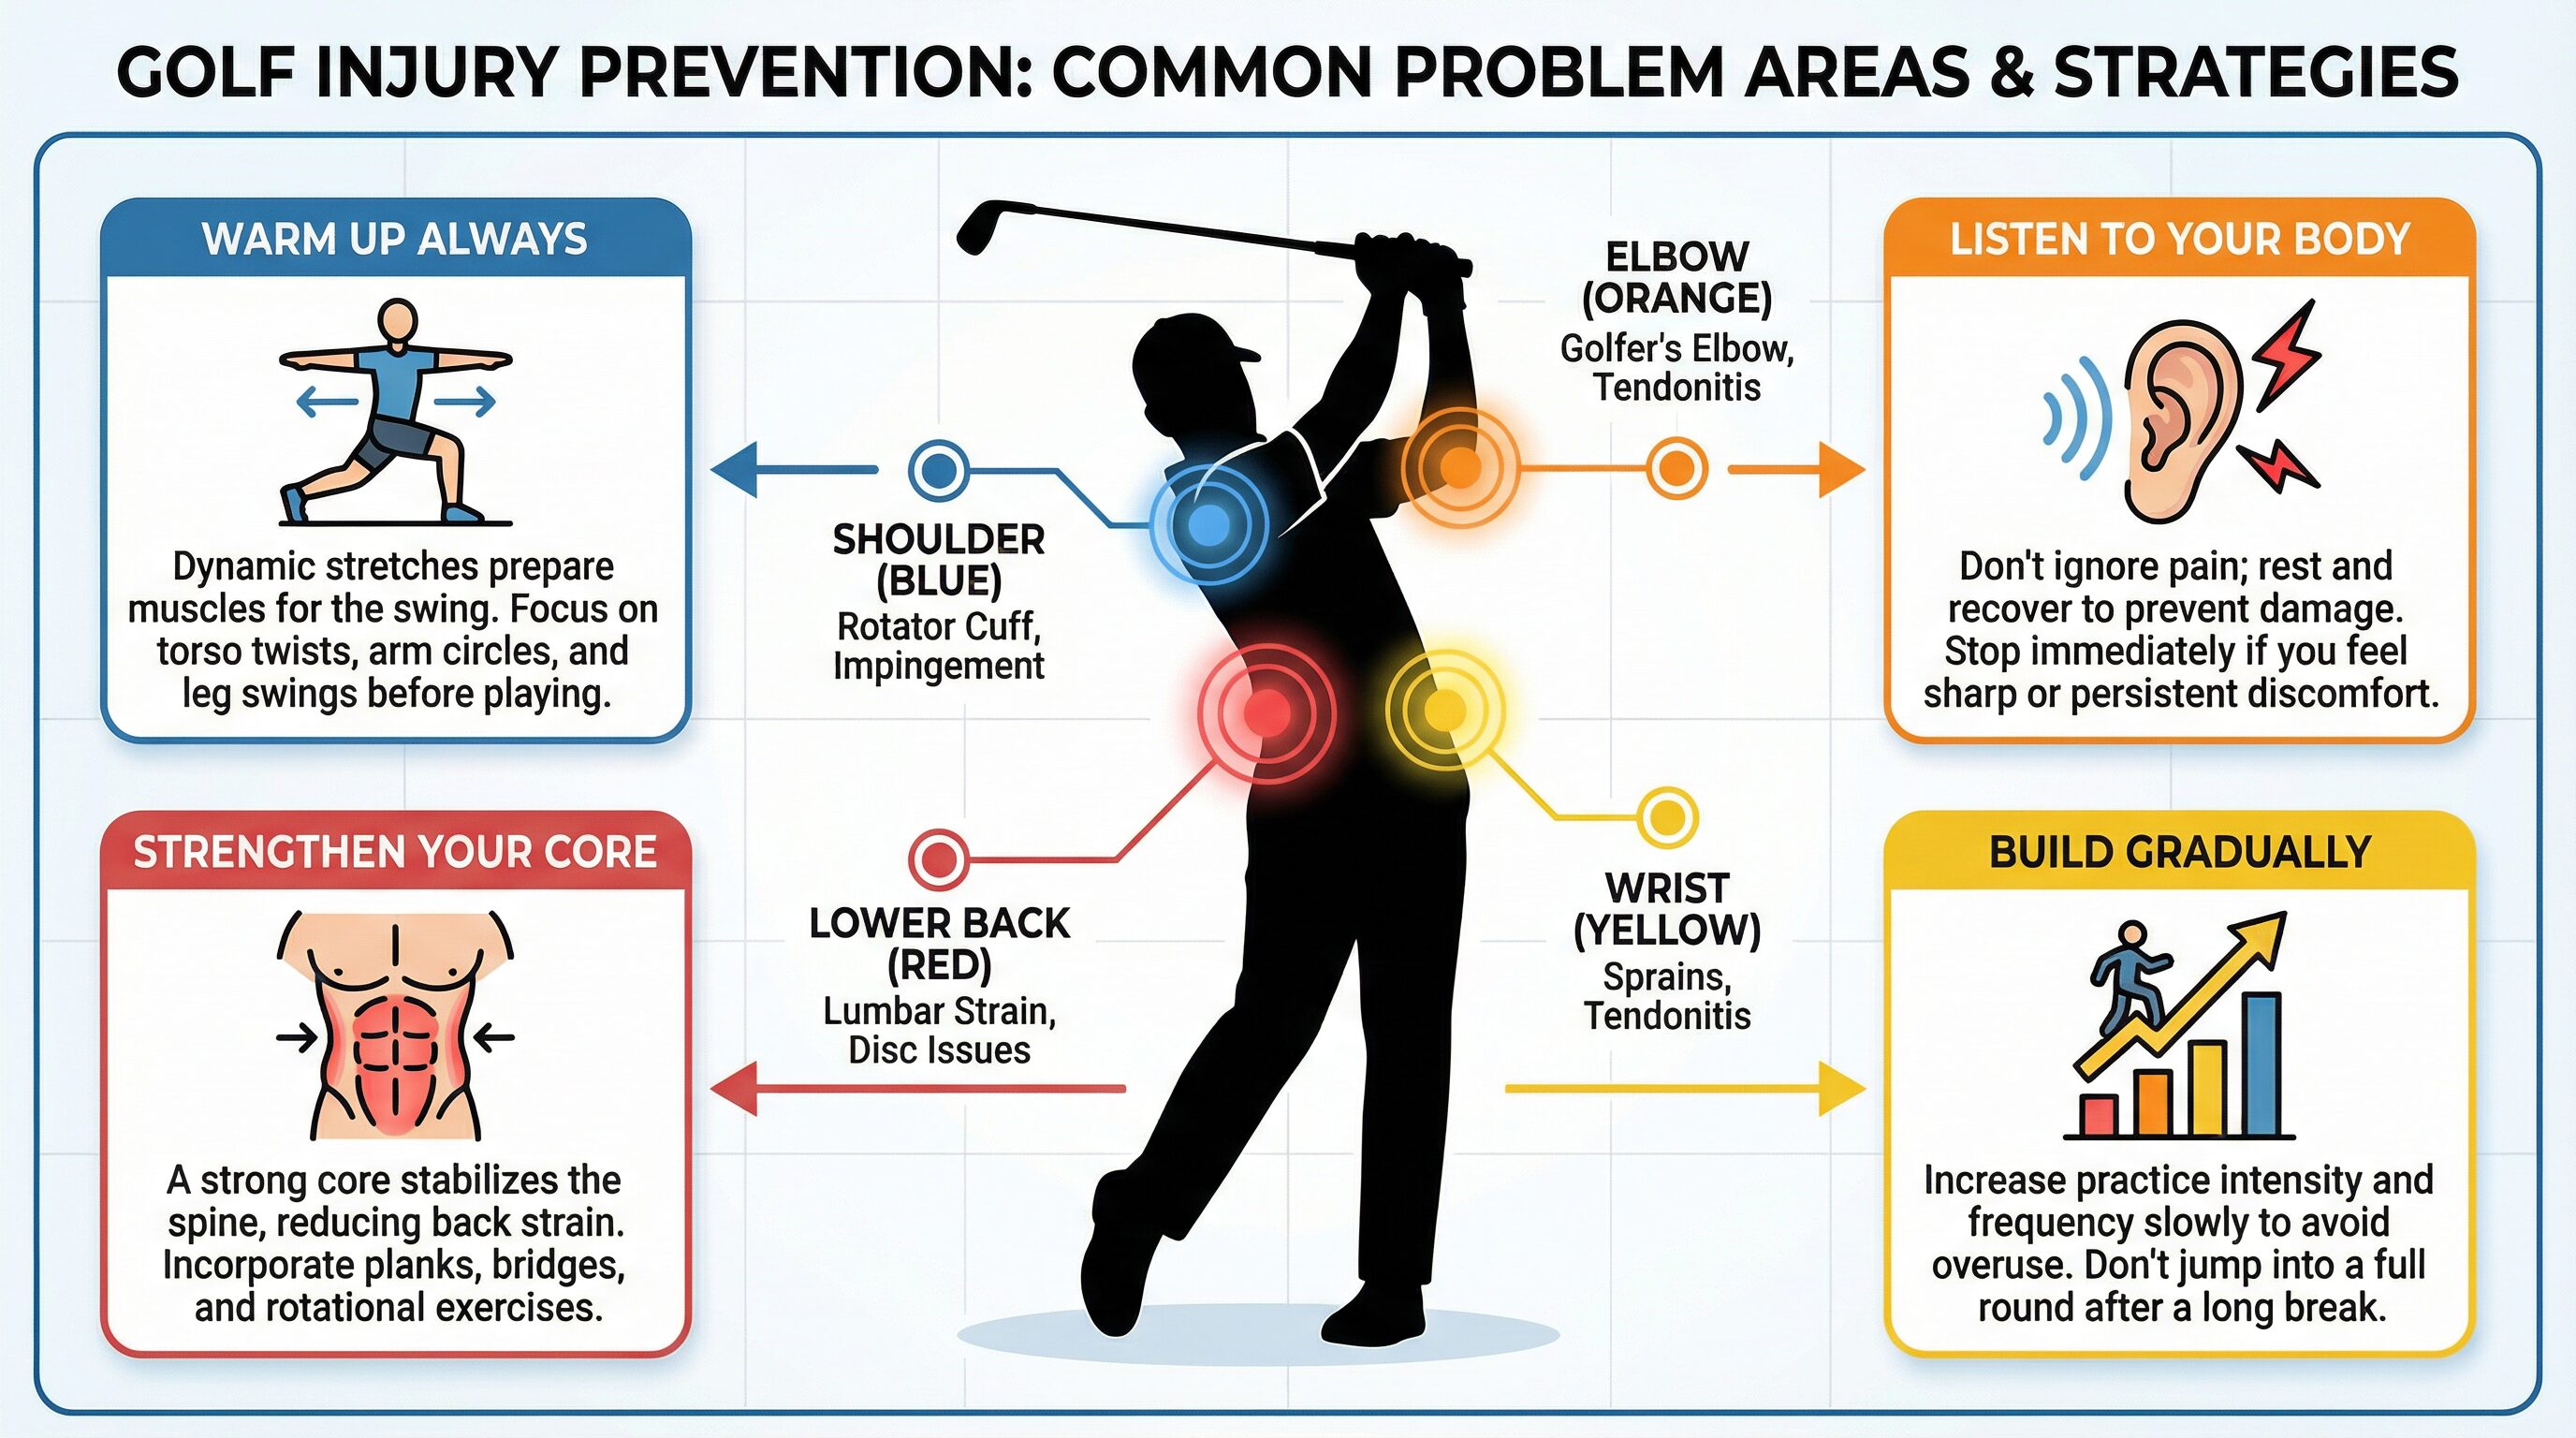
Interestingly, while golfer’s elbow (medial epicondylitis) gets its name from the sport, lateral epicondylitis—more commonly known as tennis elbow—is actually the more prevalent elbow injury among golfers . This happens because of the prolonged grip and positioning of the wrist while gripping a golf club. Other potential injuries include triceps tendonitis, rotator cuff injuries, and lower back sprains and strains.

Here are the most important strategies to stay injury-free:

Always Warm Up: Never step onto the first tee cold. A 5-10 minute dynamic warm-up (like the one in the workout plan) increases blood flow to your muscles and prepares your joints for the rotational demands of the swing. Stretch frequently, using slow, controlled movements that work through your full range of motion. Pay particular attention to the mobility of your shoulders, neck, wrists, and lower back, since flexibility is key for a smooth swing .

Listen to Your Body: This is the golden rule. Pain is your body’s signal that something is wrong. The “no pain, no gain” mantra does not apply to joint pain in golf. If you feel a sharp or unusual pain, it’s time to rest. After about two weeks, you should be pain-free and can return to playing. But if you notice the pain comes back, you should stop and see a doctor . Pushing through pain is the fastest way to turn a minor issue into a major setback.

Strengthen Your Core: A strong and stable core is your best defense against lower back pain. It acts as a corset, protecting your spine from excessive rotational forces. Incorporate exercises like planks, bridges, and rotational core work into your routine.

Build Gradually: If you haven’t played in a while, don’t jump into a full round or multiple rounds in quick succession. Increase practice intensity and frequency slowly to avoid overuse. This is especially important as we age, when muscles and joints are more prone to overuse injuries.

Conclusion: The Time to Start is Now

The winter off-season is a gift. It’s an opportunity to invest in your most important piece of golf equipment: your body. By dedicating just a few hours a week to a structured fitness program, you can build a foundation of mobility, strength, and power that will pay massive dividends when the season begins.

Don’t wait for spring to start thinking about your golf game. Start today. Begin with the mobility exercises, gradually incorporate the strength and core work, and then add in the power movements as you feel comfortable. Track your progress, stay consistent, and trust the process. When you step onto the first tee next season, you won’t just feel ready—you’ll be objectively, measurably better. Your swing will be faster, your body will be more resilient, and your scores will reflect the work you put in during the cold months.

References

[1] Carroll, M. (2025, October 8). Off Season Golf Workouts: Build Speed, Strength, and Mobility. Fit For Golf.

[2] Houston Methodist. (2025, February 24). A Golfer’s Guide to Strength, Mobility, and Injury Prevention.

Continue Reading
Advertisement
ADVERTISEMENT

ADVERTISEMENT

ADVERTISEMENT

ADVERTISEMENT

ADVERTISEMENT

ADVERTISEMENT

ADVERTISEMENT

ADVERTISEMENT

ADVERTISEMENT

ADVERTISEMENT

ADVERTISEMENT

ADVERTISEMENT

ADVERTISEMENT

ADVERTISEMENT

ADVERTISEMENT

ADVERTISEMENT

ADVERTISEMENT

ADVERTISEMENT

ADVERTISEMENT

ADVERTISEMENT

ADVERTISEMENT

PING Hoofer

ADVERTISEMENT

ADVERTISEMENT

ADVERTISEMENT

ADVERTISEMENT

ADVERTISEMENT

ADVERTISEMENT

ADVERTISEMENT

ADVERTISEMENT

ADVERTISEMENT

ADVERTISEMENT

ADVERTISEMENT

ADVERTISEMENT

ADVERTISEMENT

ADVERTISEMENT

Drills

How to Practice Golf When You Don’t Have Time

Busy golfer? Learn how to practice golf effectively in just 15 minutes. Proven drills, at-home practice tips, and range prioritization strategies for time-starved players.

Avatar photo

Published

on

I hear it all the time from my students: “I’d love to practice more, but I just don’t have the time.” Between work, family obligations, and everything else life throws at you, finding two or three hours to spend at the range can feel impossible. And I get it. Most of my students are busy professionals, parents, or both. They’re juggling meetings, school pickups, and a hundred other responsibilities. The idea of carving out significant practice time feels like a luxury they can’t afford.

Here’s the good news: you don’t need hours of practice to improve your golf game. In fact, some of the most effective practice sessions I’ve seen have been short, focused, and intentional. The key isn’t how much time you spend practicing—it’s how you use the time you have. In this article, I’m going to show you how to practice golf effectively even when you’re short on time. We’ll cover efficient practice frameworks, at-home drills you can do in minutes, and how to prioritize your limited range time for maximum impact.

The Myth of Long Practice Sessions

Let’s start by dispelling a common myth: the belief that you need long practice sessions to improve. Many golfers think that unless they can spend two hours at the range, there’s no point in practicing at all. This all-or-nothing mindset is one of the biggest obstacles to improvement for busy golfers.

The truth is that short, focused practice sessions are often more effective than long, unfocused ones. When you only have fifteen or twenty minutes, you’re forced to be intentional about what you work on. You can’t afford to waste time mindlessly hitting balls. You have to have a plan, execute it, and move on. This kind of deliberate practice—where you’re working on specific skills with clear goals—is exactly what drives improvement.

Research in skill acquisition supports this. Studies have shown that shorter, more frequent practice sessions often lead to better retention and skill development than longer, less frequent ones. Your brain learns more effectively when you practice regularly, even if each session is brief. Think of it like learning a language: fifteen minutes of focused practice every day is more effective than cramming for three hours once a week.

So if you’re a busy golfer who can only squeeze in short practice sessions, you’re actually in a better position than you might think. The key is to make those sessions count. Let’s talk about how to do that.

A busy professional golfer in business casual attire practicing putting in their office during a break, showing that practice can fit into any schedule.

The 15-Minute Practice Framework

When you only have fifteen minutes to practice, structure is everything. You need a clear plan that focuses on the skills that will have the biggest impact on your scores. Here’s a framework I use with my time-starved students, and it works remarkably well.

3 Golf Practice Drills for Busy Players

Minutes 1-5: Putting (Speed Control)

Start with putting, specifically speed control. This is the most important skill in golf, and it’s also one of the easiest to practice in a short time frame. Set up two balls at different distances from the hole—one at ten feet, one at twenty feet. Your goal is simple: get both balls to finish within three feet of the hole. Don’t worry about making putts; focus entirely on controlling your speed.

Get the prefect practice putting mat

Why speed control? Because it’s the foundation of good putting. If you can consistently control your speed, you’ll make more putts and dramatically reduce three-putts. And unlike reading greens, which requires experience and feel, speed control is a mechanical skill you can develop through deliberate practice.

Minutes 6-10: Chipping (One Landing Spot)

Next, move to chipping. Set up three balls at different distances from the green—say, five yards, ten yards, and fifteen yards. Pick a single landing spot on the green, about three feet onto the putting surface. Your goal is to land all three balls on that spot, regardless of where you’re chipping from.

This drill teaches you to control trajectory and distance by adjusting your swing length and club selection. It’s a fundamental skill that will save you strokes around the green. And because you’re working with a specific target and a clear goal, you’ll see improvement quickly.

Get the Champkey chipping set

Minutes 11-15: Full Swing (One Specific Focus)

Finally, spend five minutes on your full swing, but here’s the key: work on only one specific element. Maybe it’s your takeaway, your weight shift, or your follow-through. Pick one thing, and focus on it exclusively for those five minutes. Hit five to seven balls, paying attention only to that one element.

This kind of focused practice is far more effective than hitting thirty balls with no particular goal. You’re training your body to make a specific movement pattern, and you’re doing it with intention. Over time, these small improvements add up to significant changes in your swing.

That’s it. Fifteen minutes, three skills, clear goals. If you can do this three or four times a week, you’ll see noticeable improvement in your game. The key is consistency and focus. You’re not trying to fix everything at once—you’re working on specific skills that matter most.

A golfer practicing chipping in their backyard with a target, demonstrating efficient at-home practice.

At-Home Drills You Can Do in Minutes

One of the best things about golf is that you can practice many of the most important skills at home, without ever going to a range or course. Here are some at-home drills that take just a few minutes but deliver real results.

Putting Mat Routine (5 Minutes)

If you don’t have a putting mat, get one. It’s one of the best investments you can make for your golf game. A good putting mat allows you to work on your stroke mechanics, alignment, and speed control from the comfort of your home.

Here’s a simple five-minute routine: Set up three balls at three feet, six feet, and nine feet from the hole. Start with the three-footer. Make five putts in a row before moving to the six-footer. Then make three putts in a row from six feet before moving to nine feet. If you miss at any point, start over from the beginning.

ADVERTISEMENT

ADVERTISEMENT

ADVERTISEMENT

ADVERTISEMENT

ADVERTISEMENT

ADVERTISEMENT

ADVERTISEMENT

ADVERTISEMENT

ADVERTISEMENT

ADVERTISEMENT

ADVERTISEMENT

ADVERTISEMENT

ADVERTISEMENT

ADVERTISEMENT

ADVERTISEMENT

ADVERTISEMENT

PING Hoofer

ADVERTISEMENT

ADVERTISEMENT

ADVERTISEMENT

ADVERTISEMENT

ADVERTISEMENT

ADVERTISEMENT

ADVERTISEMENT

ADVERTISEMENT

ADVERTISEMENT

ADVERTISEMENT

ADVERTISEMENT

ADVERTISEMENT

ADVERTISEMENT

ADVERTISEMENT

ADVERTISEMENT

ADVERTISEMENT

ADVERTISEMENT

ADVERTISEMENT

ADVERTISEMENT

This drill builds both skill and mental toughness. It forces you to focus on every putt, because one miss means starting over. And because you’re working from home, you can do this while watching TV, before bed, or during a work break.

Mirror Work (3 Minutes)

Stand in front of a full-length mirror with a club in your hands. Go through your setup routine: grip, stance, posture, alignment. Check each element carefully. Are your hands in the right position? Is your spine angle correct? Are your feet aligned properly?

Then make slow-motion swings, watching yourself in the mirror. Focus on one element at a time—maybe your backswing plane or your hip rotation. This kind of visual feedback is incredibly valuable. You’re training your body to feel what correct positions look like, and you’re building muscle memory without hitting a single ball.

Balance Drill (2 Minutes)

Good balance is essential for a consistent golf swing, and you can work on it anywhere. Stand on one leg and make slow, controlled practice swings. Hold your finish position for three seconds. This drill strengthens your stabilizer muscles and improves your body awareness.

Do ten swings on each leg. It sounds simple, but it’s surprisingly challenging, and it will make a noticeable difference in your swing stability on the course.

Grip Check (1 Minute)

Once a day, pick up a club and check your grip. Make sure your hands are in the correct position, with the right amount of pressure. This might seem trivial, but grip issues are one of the most common problems I see in amateur golfers, and they’re also one of the easiest to fix. By checking your grip daily, you’re reinforcing good habits and preventing bad ones from creeping in.

These at-home drills don’t require much time or space, but they’re incredibly effective. The key is to do them regularly. Even five minutes a day will make a difference over time.

A golfer using a putting mat in their living room, showing how practice can be integrated into daily home life.

Range Prioritization: How to Practice Golf Efficiently with Limited Time

When you do make it to the range, you need to use your time wisely. Many golfers waste their range sessions by hitting ball after ball with no clear purpose. They’re there for an hour, but they’re not actually practicing—they’re just hitting balls. If you’re short on time, you can’t afford to do that.

Here’s how to prioritize your range time for maximum impact.

Start with Short Game (Always)

If you only have thirty minutes at the range, spend at least half of it on your short game. I know this isn’t as fun as hitting drivers, but it’s where you’ll see the fastest improvement. Work on chipping, pitching, and bunker play. These are the shots that save strokes, and they’re also the shots that most golfers neglect.

Set specific goals for your short game practice. For example: “I’m going to chip ten balls and get at least seven of them within three feet of the hole.” Having a clear target makes your practice more effective and gives you immediate feedback on your progress.

Focus on One Club at a Time

When you move to full swings, resist the urge to hit every club in your bag. Instead, pick one or two clubs and work with them exclusively. Maybe it’s your seven-iron and your driver. Hit ten balls with each, focusing on a specific goal—maybe it’s hitting a consistent draw, or maybe it’s improving your contact.

By limiting the number of clubs you use, you’re giving yourself more repetitions with each one. This leads to better learning and more consistent improvement.

End with Your Favorite Shot

Always end your range session by hitting a few balls with your favorite club, executing your favorite shot. This could be a smooth seven-iron or a high fade with your three-wood. The point is to finish on a positive note, with confidence and good feels. This mental boost will carry over to your next round.

Track Your Results

Bring a small notebook or use your phone to track your practice results. Write down what you worked on, how many balls you hit, and what you noticed. This doesn’t have to be elaborate—just a few notes. Over time, you’ll be able to see patterns and track your progress, which is incredibly motivating.

A golfer at the driving range with a notebook, tracking their practice results and staying focused on specific goals.

How to Measure Progress When Time Is Limited

One of the challenges of practicing in short bursts is that progress can feel slow or hard to measure. You’re not spending hours at the range, so you might not see dramatic improvements from one session to the next. But that doesn’t mean you’re not getting better. You just need to know what to look for.

Track Small Wins

Instead of focusing on big outcomes like lowering your handicap, focus on small, measurable wins. Did you make more putts from six feet this week than last week? Did you hit more greens in regulation during your last round? Did you avoid three-putting? These small improvements are signs that your practice is working.

Keep a simple log of these wins. It doesn’t have to be fancy—just a note in your phone or a page in a notebook. Over time, you’ll see that these small wins add up to significant improvement.

Use On-Course Performance as Your Guide

Ultimately, the goal of practice is to play better golf. So pay attention to your on-course performance. Are you getting up and down more often? Are you hitting more fairways? Are you making better decisions? These are the metrics that matter.

Don’t get too caught up in how your swing looks or feels on the range. What matters is how you perform when it counts. If your scores are improving and you’re playing more consistent golf, your practice is working—even if it’s only fifteen minutes at a time.

Celebrate Consistency, Not Perfection

Finally, remember that improvement in golf is about consistency, not perfection. You’re not trying to hit every shot perfectly. You’re trying to eliminate the big misses and play more solid, reliable golf. If you’re hitting fewer terrible shots and making fewer big numbers on your scorecard, you’re improving. That’s worth celebrating.

Making Practice a Habit

The real secret to improving when you’re short on time is making practice a habit. It doesn’t have to be a big production. It doesn’t have to take hours. It just has to be consistent.

Here are some strategies to help you build a practice habit, even when you’re busy.

Schedule It Like a Meeting

If practice is important to you, treat it like any other commitment. Put it on your calendar. Maybe it’s fifteen minutes every morning before work, or maybe it’s twenty minutes on your lunch break. Whatever it is, schedule it and protect that time.

Attach It to an Existing Routine

One of the easiest ways to build a new habit is to attach it to something you’re already doing. For example, if you always have coffee in the morning, make a few practice putts while your coffee brews. If you watch TV in the evening, do some mirror work or balance drills during commercial breaks. By linking practice to an existing routine, you’re more likely to stick with it.

Lower the Barrier to Entry

Make it as easy as possible to practice. Keep a putter and a few balls in your office. Keep a wedge and a chipping net in your garage. The easier it is to practice, the more likely you are to do it. Remove the friction, and you’ll practice more.

Focus on Enjoyment

Finally, remember that practice should be enjoyable. If you’re dreading it, you won’t stick with it. So find ways to make it fun. Challenge yourself with games and drills. Track your progress and celebrate your wins. Invite a friend to practice with you. The more you enjoy practice, the more you’ll do it, and the better you’ll get.

The Bottom Line: Quality Over Quantity

If there’s one thing I want you to take away from this article, it’s this: when it comes to practice, quality matters more than quantity. You don’t need hours at the range to improve your golf game. You just need focused, intentional practice that targets the skills that matter most.

Fifteen minutes of deliberate practice—working on putting, chipping, or a specific element of your swing—is far more valuable than an hour of mindless ball-hitting. And the beauty of short practice sessions is that they’re sustainable. You can fit them into your busy life without feeling overwhelmed or guilty about taking time away from other responsibilities.

So if you’re a busy golfer who loves the game but struggles to find time to practice, I encourage you to try the fifteen-minute framework. Pick a few at-home drills. Prioritize your short game when you make it to the range. Track your progress and celebrate your small wins. Over time, you’ll see real improvement in your game—not because you spent more time practicing, but because you practiced smarter.

Golf is a lifelong game, and improvement doesn’t happen overnight. But with consistent, focused practice—even in small doses—you can continue to get better, no matter how busy your life gets. And that’s something worth making time for.

Continue Reading

Drills

The One Setup Change That Instantly Improves Ball Striking

Discover the one setup change that can instantly transform your ball striking. Resident PGA Pro breaks down how a simple shift in sternum alignment and weight distribution can eliminate fat and thin shots for good.

Avatar photo

Published

on

The One Setup Change That Instantly Improves Ball Striking - professional golf photography for The One Setup Change That Instantly Improves Ball Striking

I see it every single day on the lesson tee. A golfer walks up, pulls a mid-iron from their bag, and proceeds to strike the ground three inches behind the ball or thin a shot that screamingly misses the green. They usually look at their clubface or complain about their swing plane, but the reality is much simpler. Most amateur struggles aren’t born in the middle of the downswing; they are rooted in the address position. Today, I want to share the one setup change that has transformed more of my students’ games than any complex swing thought ever could.

Let’s work through this together. We often get caught up in the flashy world of technology and high-speed video analysis, but the fundamentals remain the ultimate gatekeeper of your scorecard. If you are tired of inconsistent contact and want to finally feel that buttery-soft compression at impact, you don’t need a new swing. You need a better foundation. This single adjustment to your lead-side alignment is the game improvement secret you’ve been searching for to stabilize your strike and gain immediate distance.

The Power of the One Setup: Shifting Your Sternum

The key is understanding where your center of gravity sits in relation to the ball. Most golfers set up with their weight distributed 50/50 or, even worse, leaning slightly toward their trailing foot. While this feels powerful, it moves the low point of your swing arc behind the golf ball. When I talk about the one setup change that matters, I am talking about preset forward shaft lean and centering your sternum slightly ahead of the ball at address.

When your sternum is behind the ball, you are essentially asking your body to perform a miracle to get back to a clean impact position. By shifting your upper body center just an inch or two toward the target during your setup, you are pre-setting a downward strike. This is the hallmark of professional ball striking. It ensures that the clubhead reaches its lowest point after it has already made contact with the turf, creating that elusive ball-then-turf interaction we all crave.

Here’s how I want you to visualize it: imagine a plumb line hanging from the center of your chest. In your current setup, that line likely points directly at the ball or behind it. For the one setup that changes everything, I want that plumb line to point exactly one inch in front of the ball toward your target. This subtle shift ensures your weight stays internal and forward, preventing the dreaded “hang back” that causes chunks and thins.

Why This Game Improvement Tactic Works for Every Club

You might be wondering if this applies to your wedges as much as your long irons. The answer is a resounding yes. In fact, this is one of the most versatile golf tips I can offer because it standardizes your delivery. When your lead hip and sternum are stacked correctly, the radius of your swing becomes predictable. Predictability is the cornerstone of game improvement today, where we prioritize consistency over raw, uncontrolled power.

During a recent lesson with a high-handicap student, we focused entirely on this lead-side pressure. He was convinced he had a “casting” problem with his wrists. I showed him that his wrists were only casting because his body was trying to reach a ball that his setup had placed too far forward relative to his center. Once we implemented the one setup adjustment—leaning the shaft forward and centering the chest over the lead foot—his “casting” disappeared instantly. His body finally had the space to rotate properly.

ADVERTISEMENT

ADVERTISEMENT

PING Hoofer

ADVERTISEMENT

ADVERTISEMENT

ADVERTISEMENT

ADVERTISEMENT

ADVERTISEMENT

ADVERTISEMENT

ADVERTISEMENT

ADVERTISEMENT

ADVERTISEMENT

ADVERTISEMENT

ADVERTISEMENT

ADVERTISEMENT

ADVERTISEMENT

ADVERTISEMENT

ADVERTISEMENT

ADVERTISEMENT

ADVERTISEMENT

ADVERTISEMENT

ADVERTISEMENT

ADVERTISEMENT

ADVERTISEMENT

ADVERTISEMENT

ADVERTISEMENT

ADVERTISEMENT

ADVERTISEMENT

ADVERTISEMENT

ADVERTISEMENT

ADVERTISEMENT

ADVERTISEMENT

ADVERTISEMENT

ADVERTISEMENT

ADVERTISEMENT

ADVERTISEMENT

The Role of Forward Shaft Lean

A major component of this setup change is the position of your hands. If your sternum moves forward, your hands must follow. At address, your lead arm and the club shaft should form a straight line that points toward your lead shoulder. This prevents the clubhead from passing the hands too early in the hitting zone. It’s a simple mechanical advantage that delofts the club and increases ball speed without any extra physical effort.

Mastering the Lead-Side Pivot

Now that we’ve adjusted the address, we have to talk about how it affects the movement. Because you are starting in a more “forward” position, your backswing will naturally feel more compact and controlled. You won’t feel the need to sway off the ball to find power. Instead, you’ll find that you can pivot around your lead leg with much more efficiency. This is a primary pillar of modern game improvement: minimizing unnecessary lateral movement.

Focus on the fundamentals of the turn. As you take the club back from the one setup position, maintain the pressure in the inside of your lead foot. You should feel like you are winding up against a sturdy post. This coiled tension is what translates into explosive speed on the way down. If you sway back, you lose the advantage of the setup. Stay centered, stay tall, and let your shoulders rotate around that slightly forward-leaning spine angle.

I often tell my students to imagine they are standing in a narrow barrel. You want to turn within that barrel without bumping the sides. By starting with your weight slightly forward, you’ve already cleared the space you need for the downswing. It’s a proactive approach to the golf swing rather than a reactive one. You are no longer fighting your own geometry; you are using it to your advantage.

Drill: The Lead-Toe Balance

If you’re struggling to feel this, try this simple drill. Set up to the ball normally, then lift the heel of your trailing foot off the ground, balancing only on your toe. This forces nearly 80% of your weight onto your lead side. Hit a few half-shots from this position. You’ll notice how easy it is to strike the ball cleanly when your center is stabilized forward. This is the extreme version of the one setup change we’re looking for, and it’s a great way to build muscle memory.

Applying Swing Principles to Your Routine

As we move further into 2026, the trend in instruction is moving toward simplicity. We are moving away from the thousand-point checklists and toward singular, impactful changes. This setup adjustment fits that mold perfectly. It’s a “set it and forget it” mechanic. Once you verify your alignment and sternum position in your pre-shot routine, you no longer have to think about it during the swing.

Incorporating this into your routine is easy. Start by standing behind the ball and picking your target. As you walk into your stance, place your lead foot first and align your lead hip over it. Only then should you set your trailing foot. This ensures your foundation is built from the target-side back, rather than just standing wide and hoping for the best. It’s these small golf tips that separate the single digits from the mid-handicappers.

Remember, the goal of game improvement isn’t just to hit one good shot; it’s to make your bad shots better. When you utilize the one setup that favors the lead side, your “misses” become thin shots that still chase up toward the green, rather than fat shots that leave you 40 yards short. That shift in your miss-hit profile is what actually lowers your handicap over the course of a season.

Conclusion: Your Path to Better Contact

Improving your ball striking doesn’t require a total swing overhaul or hours of grueling practice. By focusing on the one setup change—centering your sternum and pressure slightly forward—you create the optimal conditions for a crisp, compressed strike. We’ve covered why this works, how it stabilizes your swing arc, and how to drill the feeling into your subconscious. These fundamentals are the most reliable path to better golf in 2026 and beyond.

I want you to take this to the range this weekend and see the difference for yourself. Focus on that lead-side alignment and watch your ball flight flatten out and penetrate. Consistency is just one setup change away. Have you tried this technique before, or do you tend to keep your weight back? Let us know how it worked for you in the comments below! What’s your biggest challenge with ball striking right now? Tell us below, and let’s get your game on track together.

Continue Reading

Drills

Master Your Game: 3 Range Drills You Can Do in Just 20 Minutes

Short on time but want to lower your scores? Our Resident PGA Pro shares 3 range drills that take only 20 minutes but deliver maximum results for your game improvement.

Avatar photo

Published

on

3 Range Drills You Can Do in 20 Minutes - professional golf photography for Master Your Game: 3 Range Drills You Can Do in Just 20 Minutes

We have all been there. You have a tee time in forty minutes, your swing feels a bit out of sync, and you are frantically pounding a bucket of balls without a clear plan. As a PGA Pro, I see this every single day on the practice tee—golfers searching for a miracle in a bucket of 100 balls. The truth is, more volume rarely leads to better scores. What you actually need is a structured, purposeful routine that sharpens your mechanics and prepares your mind for the course.

Quality practice is about intention, not duration. In today’s fast-paced world, finding three hours for the range is a luxury most of us don’t have. That is why I have developed these 3 range drills specifically designed for the golfer on a schedule. Whether you are looking for game improvement or just a quick tune-up before your Saturday morning round, let’s work through this together to ensure every swing you take actually moves the needle on your handicap.

The Gate Drill for Pure Ball Striking

The first of our 3 range drills focuses on the most fundamental aspect of the game: center-face contact. I often tell my students that you can have the most beautiful swing in the world, but if you cannot find the middle of the clubface, it simply does not matter. This drill is designed to provide immediate, tactile feedback on your swing path and impact point.

To set this up, place two alignment sticks or even two golf tees just slightly wider than the width of your clubhead. Place your ball directly in the center of this “gate.” The goal is simple: strike the ball without touching the gates. If you tend to come over the top, you will likely clip the outer gate. If your path is too far from the inside, the inner gate will let you know immediately. This is about precision and discipline.

Why Feedback Matters in Game Improvement

The reason this works so well for game improvement is that it removes the guesswork. When you are practicing alone, it is easy to fall into the trap of “feeling” like you made a good swing when the result was actually a lucky miss. The gate drill forces your hands and brain to coordinate a neutral path. Start with half-swings using a 7-iron to get the feel, then gradually work up to full speed.

In my years of teaching, I have found that golfers who spend just five minutes on this drill develop a much higher level of “clubhead awareness.” You begin to feel where the head is in space. By the time you reach the first tee, your subconscious is already calibrated to find the sweet spot. Remember, we aren’t looking for power here; we are looking for the pure click of a centered strike.

ADVERTISEMENT

ADVERTISEMENT

ADVERTISEMENT

ADVERTISEMENT

ADVERTISEMENT

ADVERTISEMENT

ADVERTISEMENT

ADVERTISEMENT

PING Hoofer

ADVERTISEMENT

ADVERTISEMENT

ADVERTISEMENT

ADVERTISEMENT

ADVERTISEMENT

ADVERTISEMENT

ADVERTISEMENT

ADVERTISEMENT

ADVERTISEMENT

ADVERTISEMENT

ADVERTISEMENT

ADVERTISEMENT

ADVERTISEMENT

ADVERTISEMENT

ADVERTISEMENT

ADVERTISEMENT

ADVERTISEMENT

ADVERTISEMENT

ADVERTISEMENT

ADVERTISEMENT

ADVERTISEMENT

ADVERTISEMENT

ADVERTISEMENT

ADVERTISEMENT

ADVERTISEMENT

ADVERTISEMENT

ADVERTISEMENT

The 9-Shot Challenge: Mastering Flight Control

Once we have established solid contact, we need to move toward shot-making. This is the second of our 3 range drills, and it is a personal favorite of mine for 2025 prep. On the course, you rarely face a perfectly flat lie with no wind. You need to be able to curve the ball and control the trajectory. The 9-Shot Challenge forces you to become a creator rather than a mechanical robot.

Here is how it works: you are going to attempt nine different shots in a row. These include a low draw, a low straight shot, and a low fade; then a medium draw, medium straight, and medium fade; and finally, a high draw, high straight, and high fade. Don’t worry if you can’t pull off all nine perfectly at first. The key is the intent. By trying to change your ball flight, you learn how your setup and swing path affect the outcome.

Technical Adjustments for Shape and Height

To hit it low, move the ball slightly back in your stance and keep your finish abbreviated. To hit it high, move it forward and let your hands finish high over your shoulder. For the draws and fades, focus on your alignment and your clubface at impact. If you want to fade it, open your stance slightly but keep the face pointed at the target. To draw it, do the opposite.

This drill is one of the best golf tips I can give for mental toughness. It prevents you from getting into a “range groove” where you hit the same club to the same target over and over. In a real round, every shot is different. By practicing these variations, you are building a toolkit that you can rely on when the wind picks up or you need to navigate around a tree on the back nine.

The Pressure-Cooker Finish

The final phase of our 20-minute session is about simulation. Many golfers can hit beautiful shots on the range but struggle to translate that to the course. This is often because the range lacks consequences. To fix this, we use the “Pressure-Cooker” drill. Pick a specific target on the range—perhaps a yardage marker or a specific flag—and imagine it is the 18th green with a career-best score on the line.

You must hit three different clubs (for example, a driver, a 6-iron, and a wedge) to three different targets. If you miss a target, you have to start the sequence over. This introduces a small but effective level of performance anxiety. It forces you to go through your full pre-shot routine: pick your line, take your breath, visualize the flight, and execute. You aren’t just hitting balls anymore; you are playing golf.

Incorporating Game Improvement Goals

As we look toward your goals for the coming year, this type of “random practice” is what separates the single-digits from the high-handicappers. It builds what we call “functional skill.” When you only have 20 minutes, spending the last five minutes under self-imposed pressure ensures that your brain stays engaged. It bridges the gap between the relaxed environment of the practice tee and the high-stakes environment of the competition.

I always tell my students: don’t leave the range until you’ve “completed” a pressure task. Even if it’s just hitting one fairway with your driver, that small win builds confidence. You want to walk to your car feeling like a winner, not like someone who just went through the motions. This intentionality is the secret sauce to rapid improvement.

Conclusion: Making the Most of Your Practice

Effective practice doesn’t require hours of your time; it requires a plan. By utilizing these 3 range drills—the Gate Drill for contact, the 9-Shot Challenge for control, and the Pressure-Cooker for realism—you can transform your game in just 20 minutes. Focus on the fundamentals, stay disciplined with your routine, and remember that every shot should have a purpose. If you commit to this structured approach, I guarantee you will see your scores begin to drop as your confidence rises.

I want to hear from you as you implement these routines. Which of these drills do you think will be the biggest challenge for your current game? Have you tried this type of timed practice before? Share your thoughts and your progress in the comments below! Let’s make 2026 your best year on the links yet.

Continue Reading

Trending